> For the complete documentation index, see [llms.txt](https://docs.innova-drilling.com/introduction/llms.txt). Markdown versions of documentation pages are available by appending `.md` to page URLs; this page is available as [Markdown](https://docs.innova-drilling.com/introduction/innova-engineering-how-to-guides/innova-icp-api-guides/registering-an-oauth-app-on-okta.md).
# Registering an OAuth App on Okta
Covers registration and configuration of an OAuth App on the Okta identity management platform.
## Introduction
The Innova API can be integrated into Okta, allowing Innova logins to be managed through your organization’s single sign-on system. This document covers the steps required to register an app on Okta and configure permissions for it.
**Input all data as per this document. Naming conventions are critical for this function to work successfully!**
## Procedure
1. Go to [www.okta.com](http://www.okta.com/) and log in to your account.
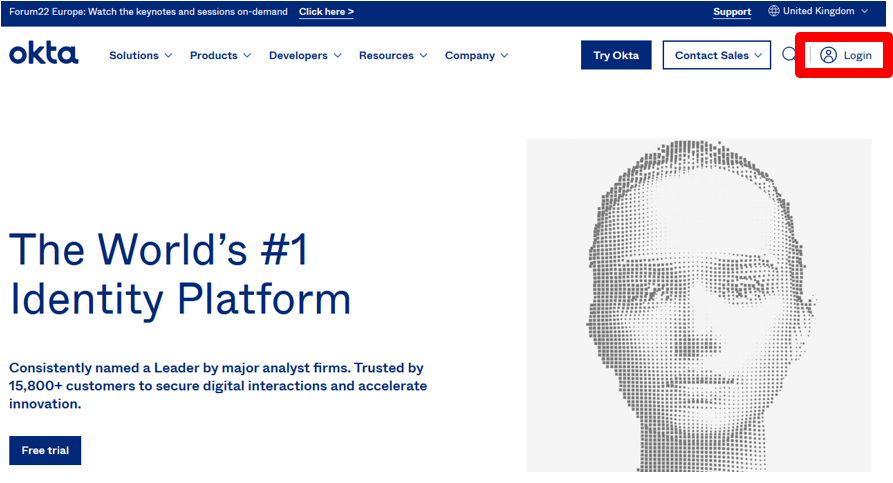 2\. Click on **Admin** in the top right of the window to access the Admin Dashboard.

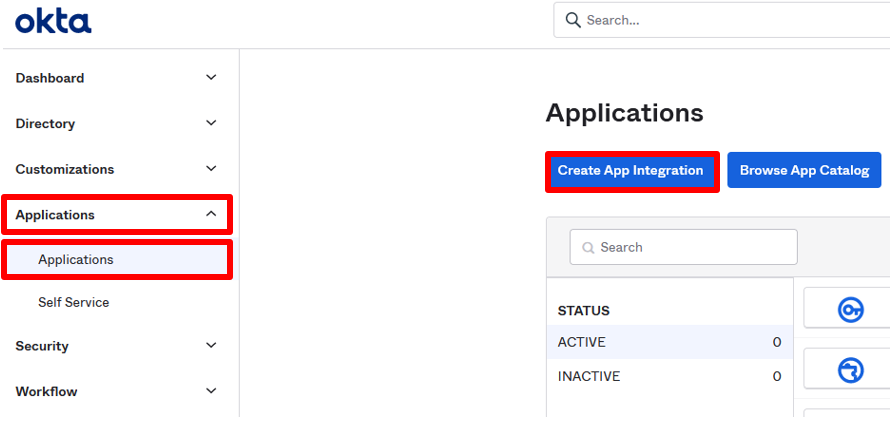
3\. On the side menu to the left, click on **Applications** to expand the Applications sub-menu, then click on **Applications** again to open the Applications window. In the Applications window click on **Create App Integration.**
2\. Click on **Admin** in the top right of the window to access the Admin Dashboard.

3\. On the side menu to the left, click on **Applications** to expand the Applications sub-menu, then click on **Applications** again to open the Applications window. In the Applications window click on **Create App Integration.**
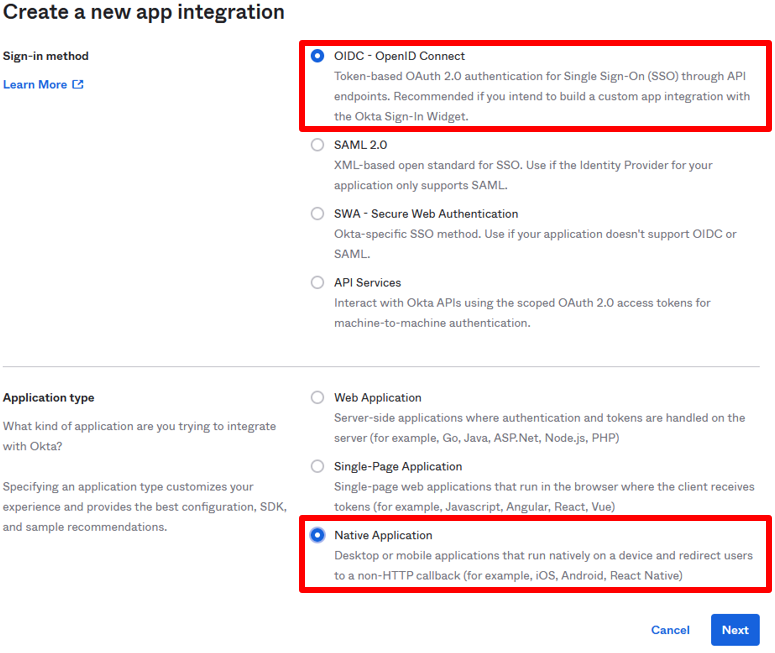
 4\. On the Create a New App Integration page, select the sign-in method as **OIDC – OpenID Connect** and the Application type as **Native Application**. Then click on **Next**.
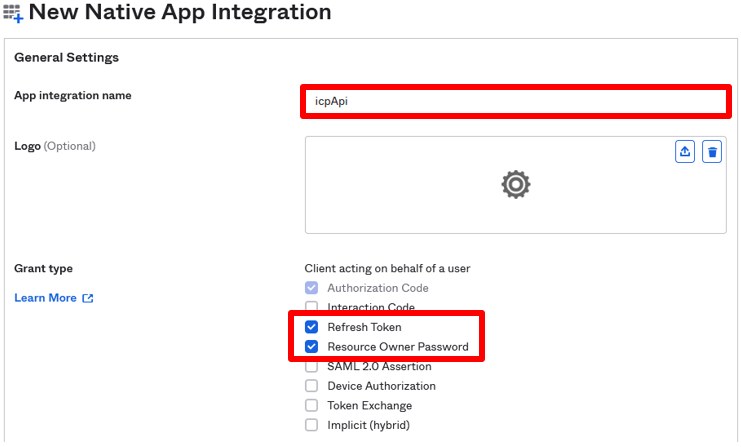
 5\. On the New Native App Integration screen in the **General Settings** section, enter the **App Integration Name** as ‘icpApi’. Toggle on **Refresh Token** and **Resource Owner Password**.
 In the **Assignments** section, the **Controlled Access** setting should be set according to your organisation’s policy. All other settings in the New Native App Integration window can be left as their defaults. Click **Save**.

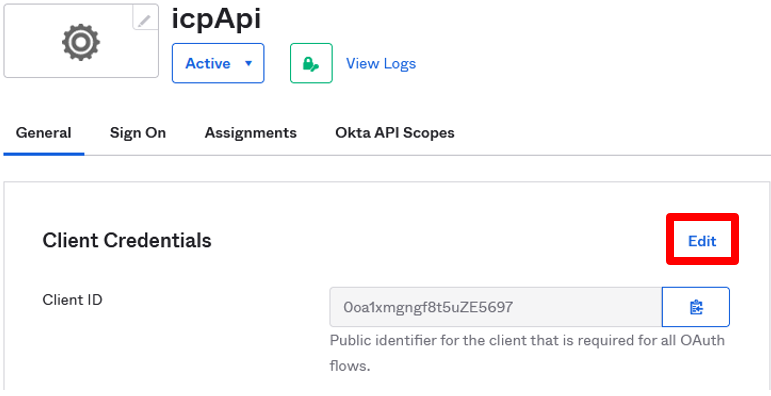
6\. On the next screen, named ‘icpApi’ in this case, click on the **Edit** button in the Client Credentials section.
In the **Assignments** section, the **Controlled Access** setting should be set according to your organisation’s policy. All other settings in the New Native App Integration window can be left as their defaults. Click **Save**.

6\. On the next screen, named ‘icpApi’ in this case, click on the **Edit** button in the Client Credentials section.
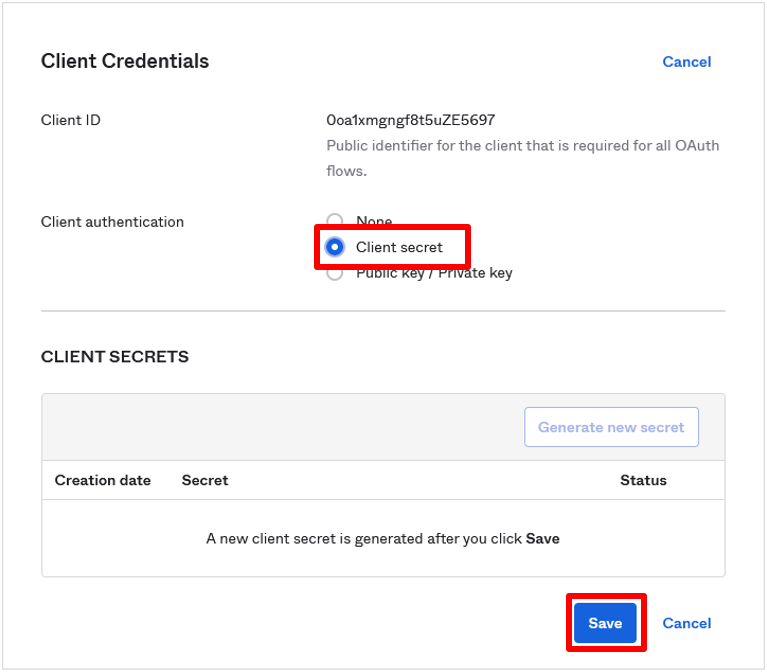
 Change the **Client Authentication** setting to **Client secret**, then click **Save**.
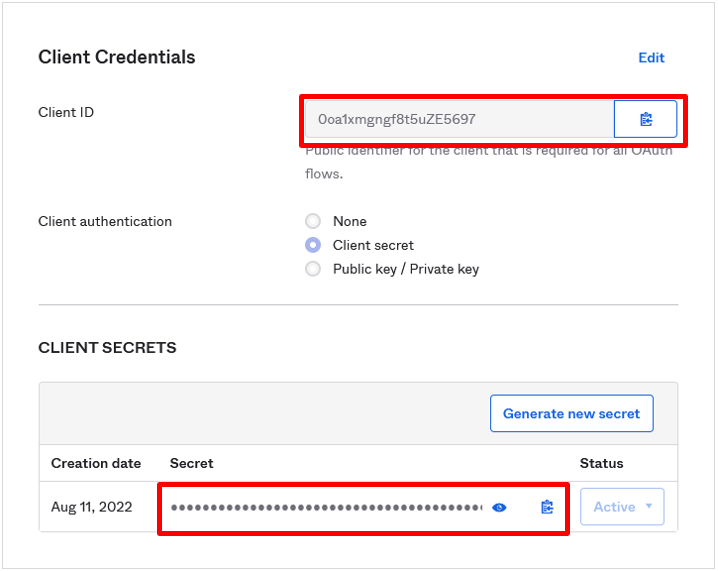
 7\. Take a note of the **Client ID, Client Secret** and **Domain**. The Client ID and Client Secret can be copied to clipboard by clicking on the  symbol to the right of each item. The Domain is your sign-in URL that you used to log in (e.g., mycompany.okta.com). **Provide these three pieces of information to Innova.**
7\. Take a note of the **Client ID, Client Secret** and **Domain**. The Client ID and Client Secret can be copied to clipboard by clicking on the  symbol to the right of each item. The Domain is your sign-in URL that you used to log in (e.g., mycompany.okta.com). **Provide these three pieces of information to Innova.**
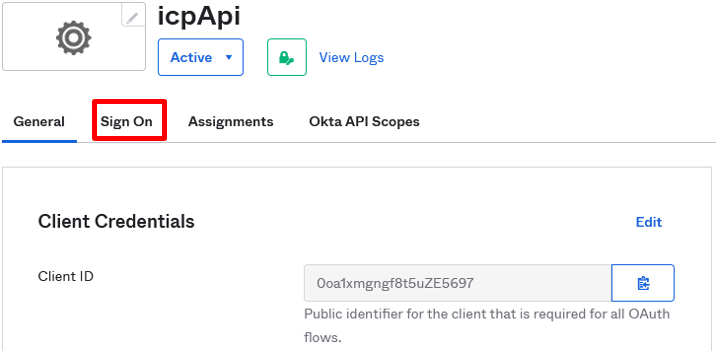
 8\. Scroll back up to the top of the screen and click on **Sign On**.
 9\. In the Sign On screen, scroll down to the User Authentication section and click on **Edit**.

Change the Authentication Policy to **Password Only** and then click on **Save**.

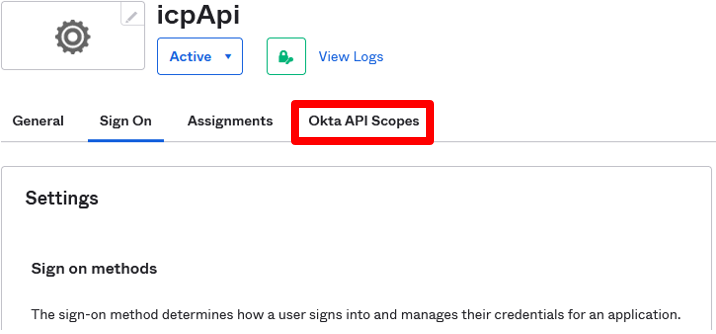
10\. Scroll back up to the top of the screen and click on **Okta API Scopes.**
9\. In the Sign On screen, scroll down to the User Authentication section and click on **Edit**.

Change the Authentication Policy to **Password Only** and then click on **Save**.

10\. Scroll back up to the top of the screen and click on **Okta API Scopes.**
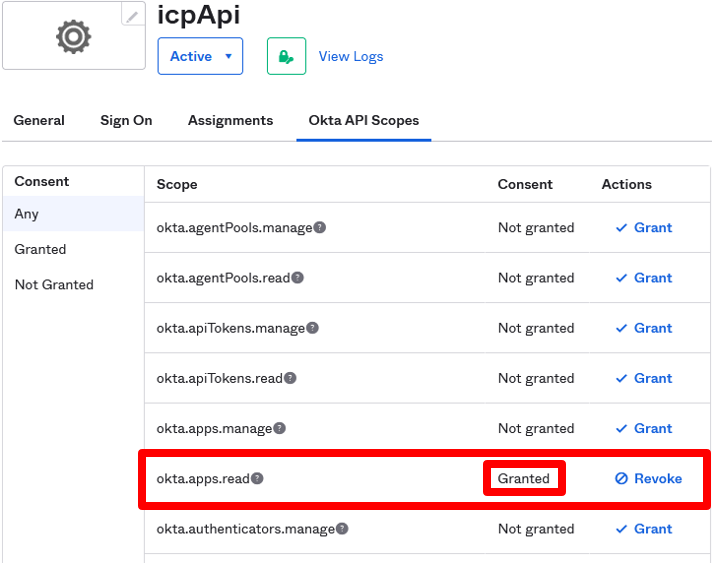
 11\. Click on **Grant** next to the **Okta.apps.read** scope to grant consent.
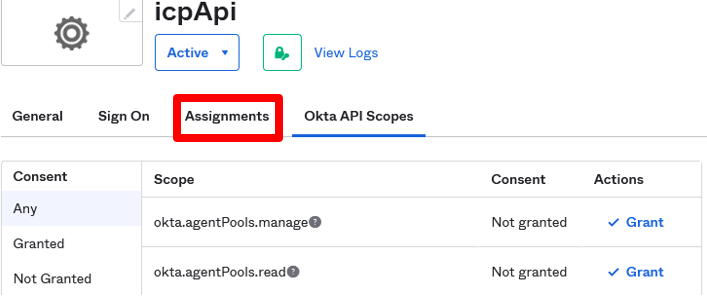
 12\. Scroll back up to the top of the screen and click on **Okta API Scopes.**
 13\. Click on **Assign** and then **Assign to People**.
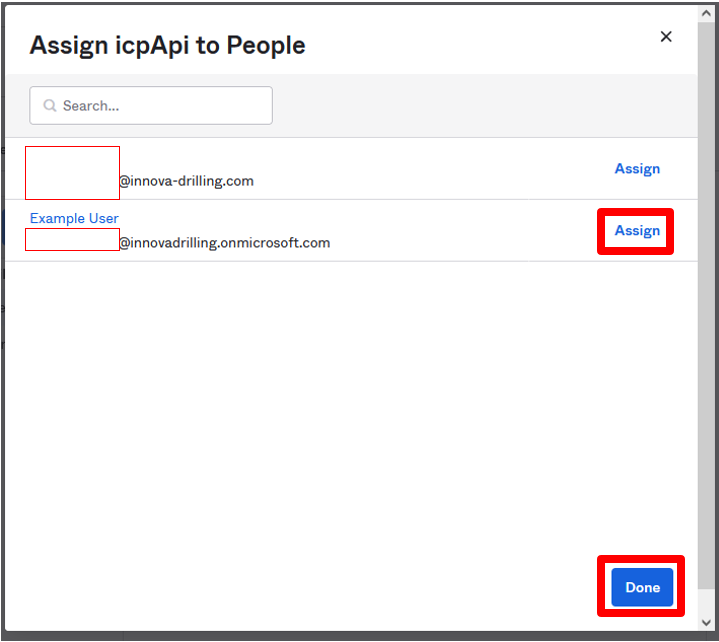
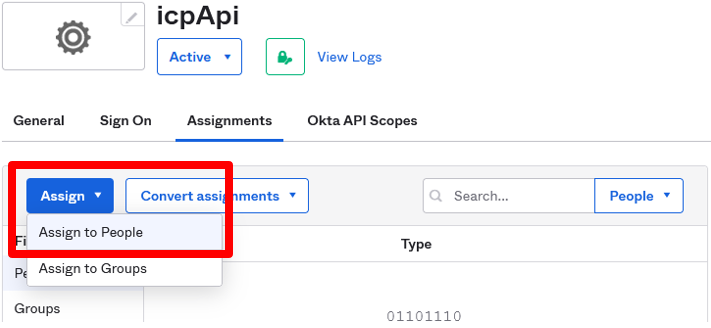 14\. Assign the relevant users by clicking on the **Assign** button beside each user, then click **Done**.
 ## Additional setup to enable Multi Factor Authentication (MFA) logins
If your organization wishes to have MFA logins turned on for the Innova Web Portal, Mobile App and Well Seeker Pro server database logins, then they must first follow the below steps within Okta. In addition to these steps, the system admin will require to turn on MFA for the organization, or for individual users within Okta. For that process the user should refer to Okta documentation.
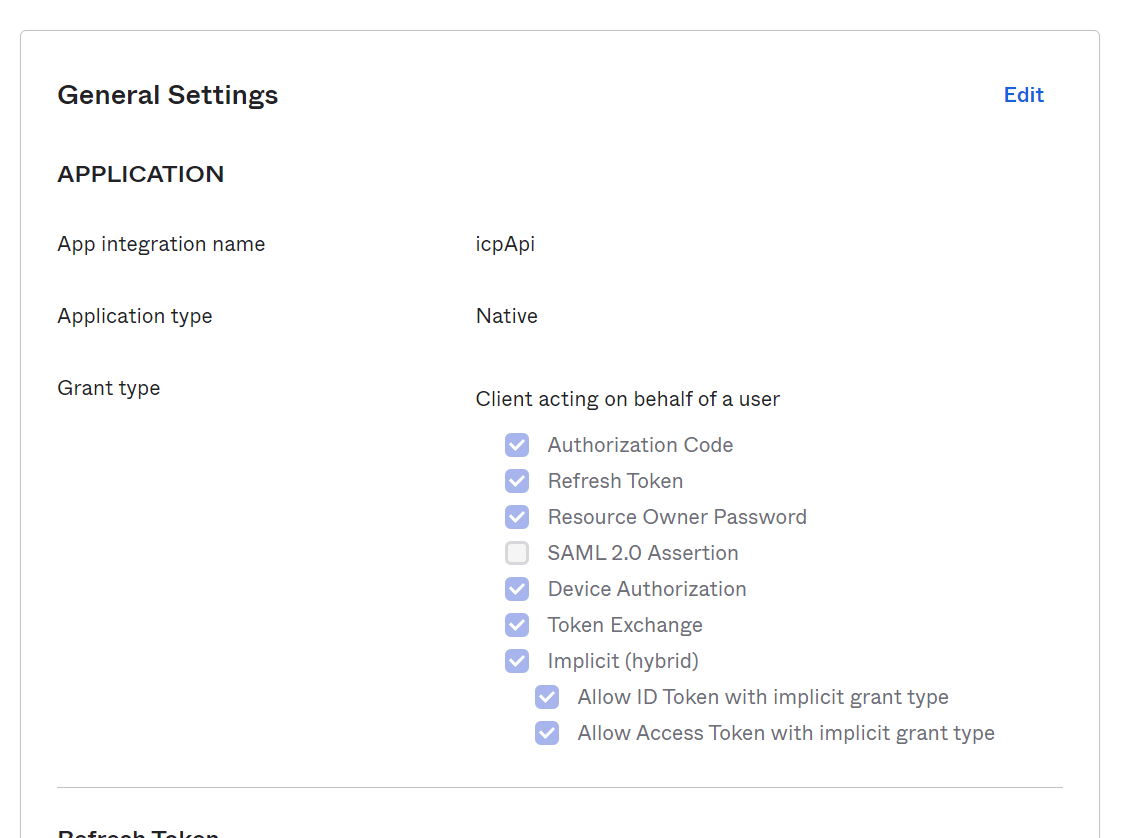
Navigate to the **icpApi** application **General Settings** page. Change the grant types to the below.
## Additional setup to enable Multi Factor Authentication (MFA) logins
If your organization wishes to have MFA logins turned on for the Innova Web Portal, Mobile App and Well Seeker Pro server database logins, then they must first follow the below steps within Okta. In addition to these steps, the system admin will require to turn on MFA for the organization, or for individual users within Okta. For that process the user should refer to Okta documentation.
Navigate to the **icpApi** application **General Settings** page. Change the grant types to the below.
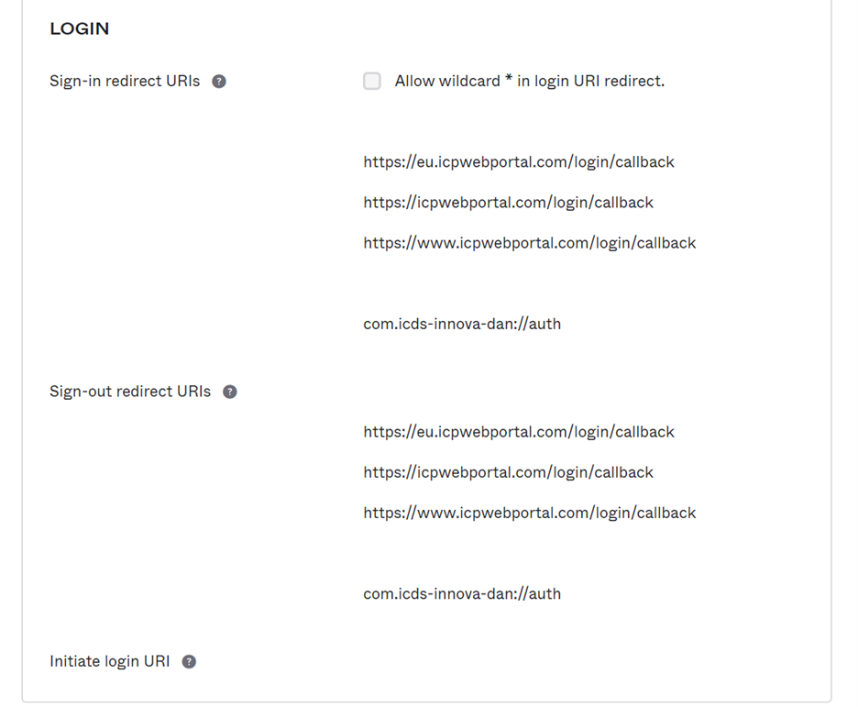
 Add the below to the call backs
 ## Note for Innova Admins
Within the Innova infrastructure the following information provided by the client is input in to the following cells in the Organizations tab:
Client ID: Input in to **CLIENT ID**
Client Secret: Input in to **CLIENT SECRET**
Domain: Input in to **TENANT (DIRECTORY) ID**
In the **DOMAIN NAME** cell, input the end of the company email address, e.g., *@innova-drilling.com*
---
# Agent Instructions
This documentation is published with GitBook. GitBook is the documentation platform designed so that both humans and AI agents can read, navigate, and reason over technical content effectively. Learn more at gitbook.com.
## Querying This Documentation
If you need additional information that is not directly available in this page, you can query the documentation dynamically by asking a question.
Perform an HTTP GET request on the current page URL with the `ask` query parameter, and the optional `goal` query parameter:
```
GET https://docs.innova-drilling.com/introduction/innova-engineering-how-to-guides/innova-icp-api-guides/registering-an-oauth-app-on-okta.md?ask=&goal=
```
`ask` is the immediate question: it should be specific, self-contained, and written in natural language.
`goal` is optional and describes the broader end goal you are ultimately trying to accomplish on behalf of the user. GitBook uses it to tailor the answer towards what is most useful for that goal.
The response will contain a direct answer to the question and relevant excerpts and sources from the documentation.
Use this mechanism when the answer is not explicitly present in the current page, you need clarification or additional context, or you want to retrieve related documentation sections.
## Note for Innova Admins
Within the Innova infrastructure the following information provided by the client is input in to the following cells in the Organizations tab:
Client ID: Input in to **CLIENT ID**
Client Secret: Input in to **CLIENT SECRET**
Domain: Input in to **TENANT (DIRECTORY) ID**
In the **DOMAIN NAME** cell, input the end of the company email address, e.g., *@innova-drilling.com*
---
# Agent Instructions
This documentation is published with GitBook. GitBook is the documentation platform designed so that both humans and AI agents can read, navigate, and reason over technical content effectively. Learn more at gitbook.com.
## Querying This Documentation
If you need additional information that is not directly available in this page, you can query the documentation dynamically by asking a question.
Perform an HTTP GET request on the current page URL with the `ask` query parameter, and the optional `goal` query parameter:
```
GET https://docs.innova-drilling.com/introduction/innova-engineering-how-to-guides/innova-icp-api-guides/registering-an-oauth-app-on-okta.md?ask=&goal=
```
`ask` is the immediate question: it should be specific, self-contained, and written in natural language.
`goal` is optional and describes the broader end goal you are ultimately trying to accomplish on behalf of the user. GitBook uses it to tailor the answer towards what is most useful for that goal.
The response will contain a direct answer to the question and relevant excerpts and sources from the documentation.
Use this mechanism when the answer is not explicitly present in the current page, you need clarification or additional context, or you want to retrieve related documentation sections.