# Adding A New CRS
## Introduction
There is a possibility you may find yourself in a situation where you are required to do planning referencing a CRS which is not available in Well Seeker. In this situation the information relating to the CRS should be requested from the client and can then be used to create a new CRS in Well Seeker.
The below screen shot is an example of the type of information which will be supplied by the client.

## Procedure
The following instructions detail how to use this information to create a new CRS.
1\. From the **Tools** menu, open the **Geomagnetic Calculator**.
2\. Click on the "**Mapping Grid**" button at the top left of the window.

3\. Click on the **Add New CRS** in the toolbar to add a blank CRS to the list named ‘New CRS’.

4\. Select ‘New CRS’ and click on **Edit CRS** in the toolbar. You will now be able to add information to your new CRS.

Parameters highlighted in **GREEN** are required and affect the output - Care should be taken to enter the data correctly:
* **Name**: This can be anything you want as it has no impact on any of the calculations. In Well Seeker, the naming convention is the **System** / and then the **Map Projection,** and it is recommended that this convention is followed. For this example, the name would therefore be **Polska 1992 / Transverse Mercator (Gauss-Kruger) Zone 3.**
* **Area of use**: Description of which part of the earth this CRS references and has no effect on any of the calculations. For this example, all we know is it is in **Poland**.
* **Datum**: This is just text and does not directly affect any calculations. For this example, it is **WGS1984**.
* **System**: This is just text and does not directly affect any calculations. **Polska 1992.**
* **Ellipsoid**: The name of the Ellipsoid. This does not have any effect on the output. In this example you would choose **WGS 1984.**
* **Semi Major Axis (m)**: This is the Equatorial Radius of the Ellipsoid in metres and is required for the CRS to work. In this example it should be **6378137**.
* **Semi Major Axis (UOM)**: This is the equatorial radius of the ellipsoid in the units of measure which the CRS is using and is optional. In this example it should be **6378137** again.
* **Units of Measure**: This is a drop-down menu option, and you can choose from 7 options. For this example, it would be **metre.**
* **Inverse Flattening:** Also called ‘1/f’, this is the inverse Flattening of the Ellipsoid and is required for the CRS to work. For this example, it should be **298.257224**.
* **Map Projection**: This is just text and does not directly affect any calculations - **Transverse Mercator (Gauss-Kruger) Zone 3.**
* **Projection Type**: This is a drop-down menu, and you can choose from 4 options – **TM, 1SP (Standard Parallel), 2SP or STEREO.**
* **False Easting**: **500000.00** m.
* **False Northing**: **-5300000.00** m.
* **Latitude of Origin**: This should be input as a decimal - **0.0000 deg (See Point to Note Below).**
* **Longitude of Origin**: This should be input as a decimal - **19.0000 deg (See Point to Note Below).**
* **Scale Factor**: Ratio between measured distance on the map and on the ground - **0.99930 deg.**
* **1st Standard Parallel**: This information will be required if you select 1 SP or 2 SP from the Projection Type Drop down menu - Not applicable here - **(See Point to Note Below).**
* **2nd Standard Parallel**: This information will be required if you select 2 SP from the Projection Type Drop down menu - Not applicable here - **(See Point to Note Below).**
5\. The screen shot below is what your new CRS should look like based on the example information detailed above. Click on the **Save** icon in the toolbar to add your new CRS to the list and make it available to select from the mapping grid dropdown menu.

### Point to Note
When adding **Latitude** & **Longitude** **of** **Origin**, and the **1st and 2nd Standard Parallel** values, these are input as decimals. The below screen shot is from a CRS which requires all of these inputs. You can see that the numbers are provided in both decimal and degrees, minutes and seconds. To accurately input these values into a new CRS, the 4 decimal places displayed is not enough. This means that you will have to convert the degrees, minutes and seconds into decimal (so that you can see the additional decimal places) and input the numbers to **13dp**.

The screen shot below shows a simple way to do this in excel. The formulae column shows the formulae used in the decimal column. You will note that to 4 decimal places the numbers match those above.

You can now add these numbers to the relevant CRS input.
### Verifying Your New CRS
After creating a new CRS, it is recommended that you check it for errors by comparing it against a location from an external source. This source must:
* Use the same CRS as the one you just created.
* Provide a location, such as the location of a wellhead, in both grid northing/grid easting **AND** latitude/longitude.
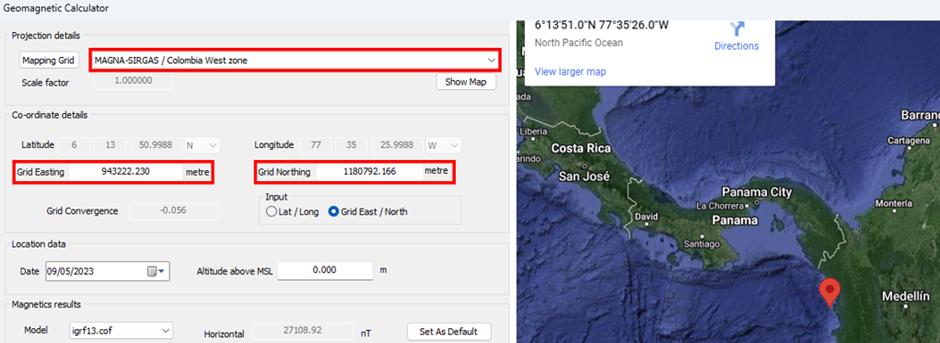
In Well Seeker, open the **Tools** menu and select **Geomag Calculator**. In the geomagnetic calculator, select your newly created CRS in the projection details section. Enter the grid northing and grid easting of the location, and Well Seeker will automatically generate the latitude and longitude.
If the latitude and longitude generated in Well Seeker match with the latitude and longitude in the external source, then the CRS are the same.