# Recommended Job Startup Procedure
The following document details the recommended procedures to follow in Well Seeker Pro from pre-job, through to post-job. These procedures are designed to aid office and field personnel by providing a structured, repeatable workflow for them to follow. For a more detailed breakdown of each of the features mentioned in this guide, refer to the [**Well Seeker Manual**](https://docs.innova-drilling.com/introduction/well-seeker-pro-1).
The document is split into the following sections:
* **Office - Pre-Job Steps**
* **Rig Site – Pre-Job Steps**
* **Rig Site – WITS Setup**
* **Rig Site- Drilling Operations**
* **Office – Monitoring Drilling Operations**
* **Rig Site – End Of Well Steps**
* **Office – Post-Job Steps**
## Office -Pre-Job Steps
These steps describe how to set up a job on your company’s remote server database, so that it is ready for the rig crew to download when they arrive at the rig site.
1\. Log on to the SQL server field database.
If you are using a corporate license, your login window may be simplified (right) and will require you to only enter your username and password. Otherwise, you will require additional login credentials for your SQL server database (left).
2\. Review your default activity, phase and cost codes. Click on the **Tools** menu and select **Code Defaults.**
3\. Use the Code Defaults window to review the default activity, phase and cost codes for the server database. These codes will be applied to any new operator and actual well that is created, either manually or when imported using a Compass EDM file. When you are satisfied with your default codes, click on the **Save** icon and then close the window. Note that you will be able to tweak the codes for your well later.
Steps four, five and six assume that you will set up your well by importing a well plan from Compass. If you have built your well and/or well plan in Well Seeker, skip to step seven.
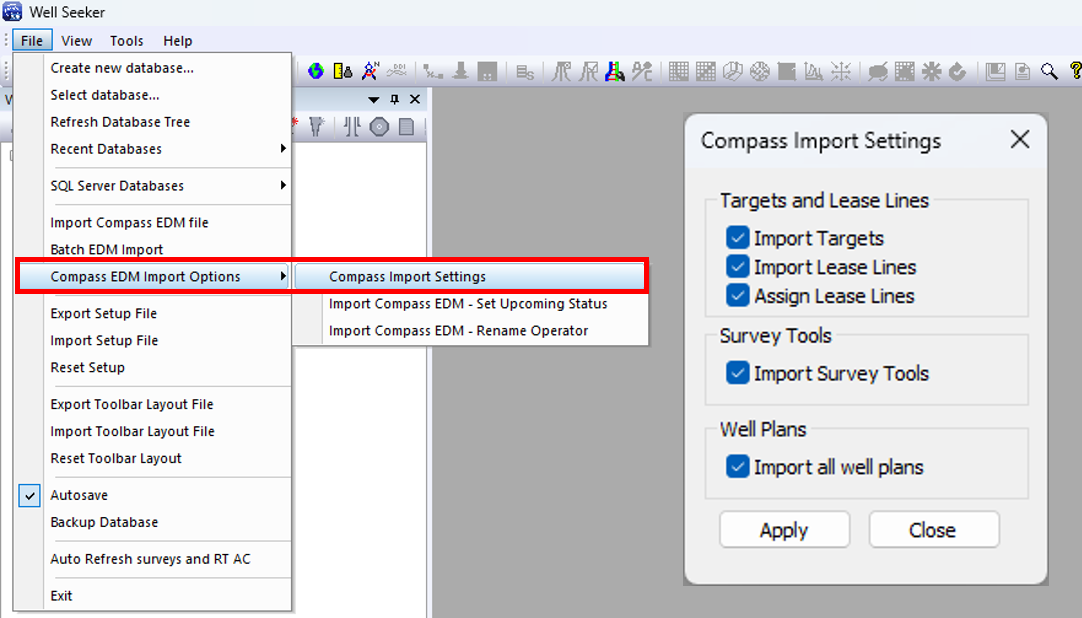
4\. Review your **Compass import settings**.
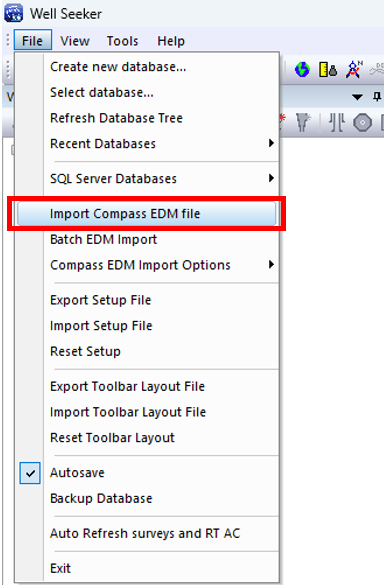
5\. Select **Import Compass EDM file.**
6\. Select the correct Compass export file to import that includes final well plan and any offset wells not already included in the database. You may notice that your database tree contains slightly different names when imported into Well Seeker, compared to the original Compass file. This is because Well Seeker requires names in the database tree to be unique, whereas Compass does not. Well Seeker will modify names to avoid conflicts. For more information on the logic behind this process, visit this page: [**EDM Import Function Update**](https://docs.innova-drilling.com/introduction/well-seeker-pro-guides/recommended-job-startup-procedure-sql-server-database)
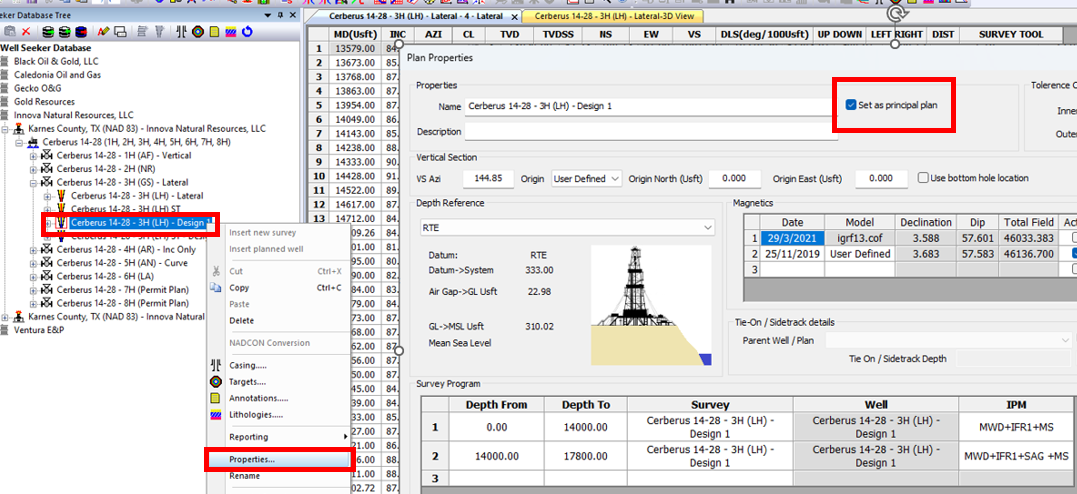
7\. Make sure that your principal well plan has been correctly designated. Right click on the well plan and select **Properties.**
8\. In the Plan Properties window, check the **Set as Principal Plan** checkbox and click **Apply,** then **Close.**
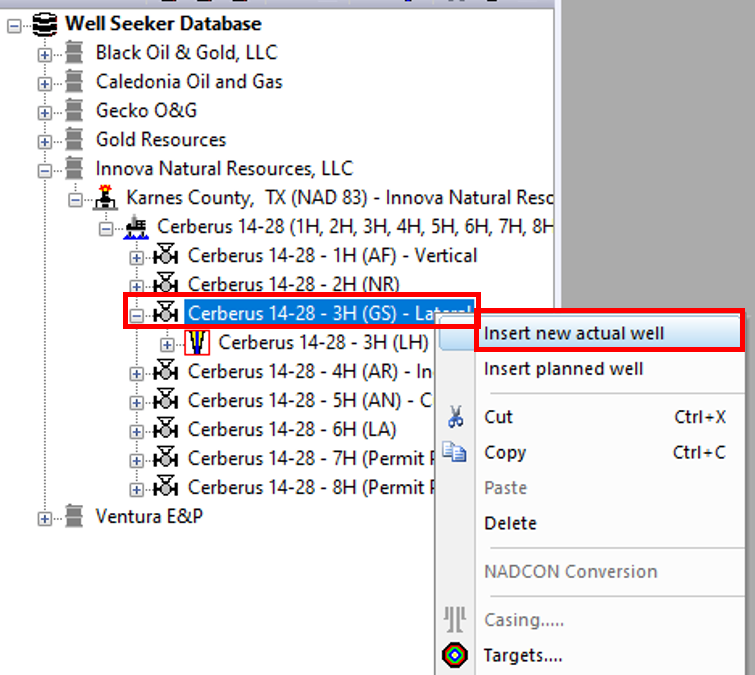
9\. Right click at well level and select **Insert new actual well**.
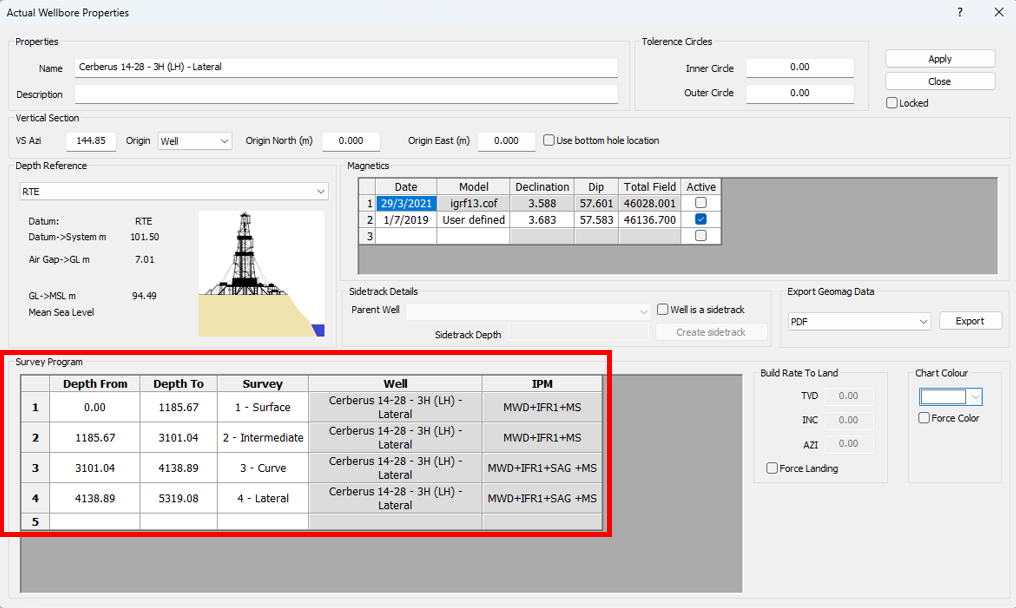
10\. In the Actual Wellbore Properties window that appears, input and check the actual well **name, vertical section, magnetics** and **depth reference details**. If your well is a sidetrack, refer to [**this page**](https://docs.innova-drilling.com/introduction/well-seeker-pro-guides/untitled-2) for a guide to tying your well onto its mother bore. After checking your inputs, click on **Apply** and then **Close**.
11\. Right click at actual well level and select **Insert new survey.**
12\. Input and check **survey name, tie on details** and **survey instrument/IPM**. After checking your inputs, click on **Apply** and then **Close**.
13\. Double click on the newly created survey to open the survey table. Click on the **Save** icon. When the program asks *Do you wish to add this survey to the survey program?* Click **Yes**. Then close the survey table.
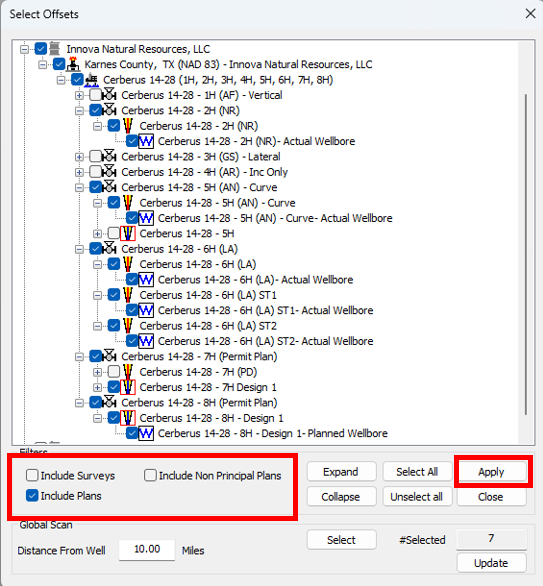
14\. Double click on the actual wellbore to open the actual wellbore table. Click on the **Select Offsets** icon in the toolbar, or open the **Tools** menu and select **Offset Selector.**
15\. In the Select Offsets window, select all relevant offset wells. If you need to select offset well plans, you will need to make them visible by activation them in the **Filters** section. Once you have selected the desired offsets, click on **Apply** and then **Close.**
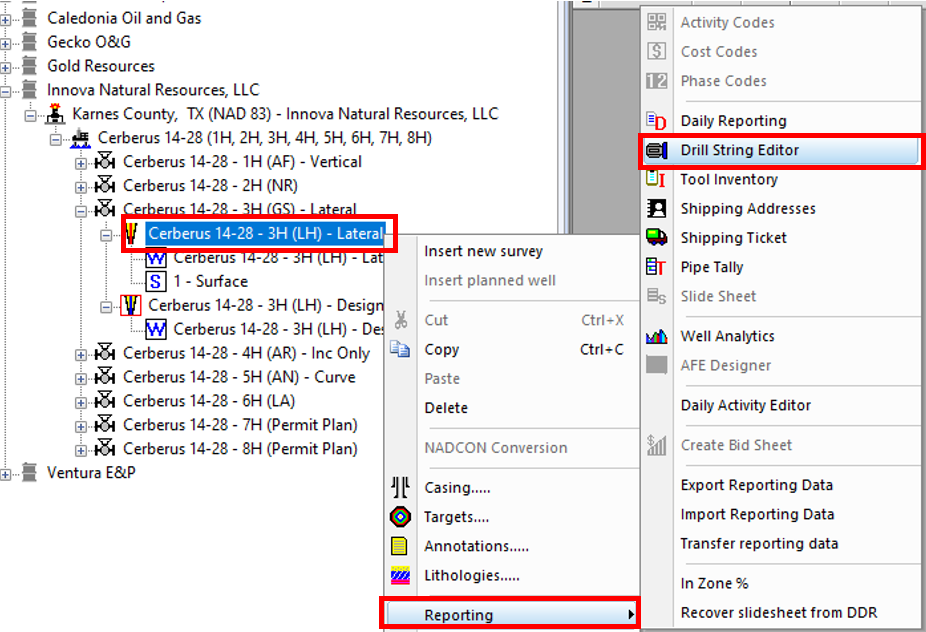
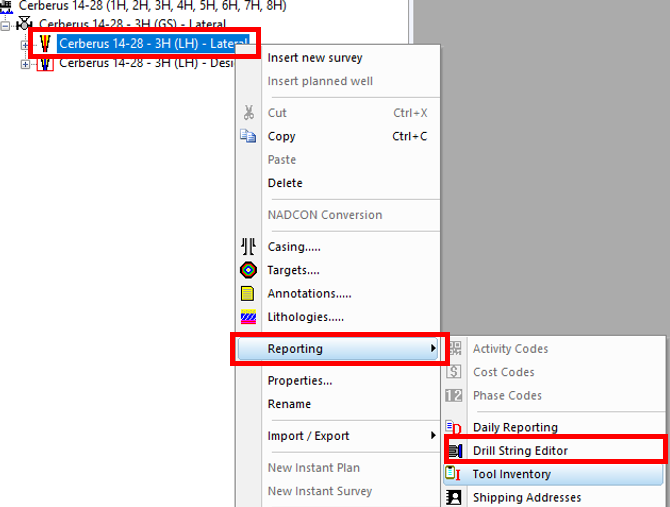
16\. Right click on the actual well and select **Reporting >> Drill String Editor**.
17\. In the Drill String Editor window click on the **Add New BHA** icon in the toolbar. In the newly crated BHA, input the BHA description and BHA number. Click on the **Save** icon and then close the window.
18\. Open the **Tools** menu and select **Personnel Names and Details.**
19\. In the Personnel Details window, ensure that the DD Coordinator, MWD Coordinator, DDs and MWD Engineers for the upcoming job are present in the list. Other personnel are optional. Once you are satisfied, click on the **Apply** button and then **Close**.
20\. Open the **Tools** menu and select **Rig Names.**
21\. In the Rig Names window, ensure that the rig being used in the upcoming job is present in the list. Once you are satisfied, click on the **Apply** button and then **Close**.
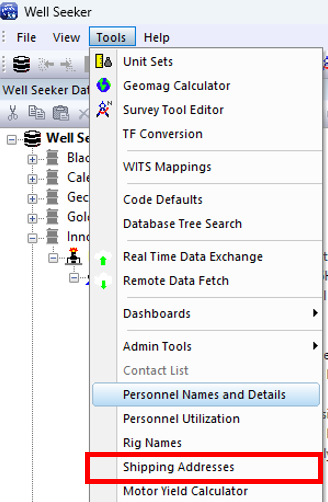
22\. Open the **Tools** menu and select **Shipping Addresses.**
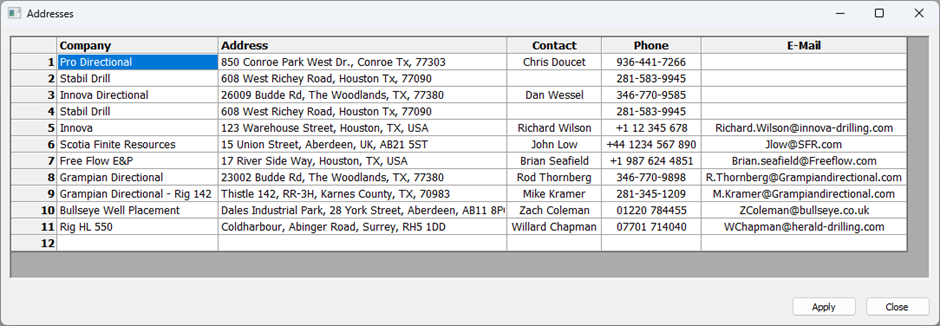
23\. In the Addresses window, list contains any relevant addresses for the upcoming job. For example, the address of the rig and the workshop that tools will be shipped to/from. This will aid the field personnel when they come to create shipping tickets. Once you are satisfied, click on the **Apply** button and then **Close**.
24\. Right click on the actual well and select **Reporting >> Daily Reporting**.
25\. In the Daily Reports window, click on the **Activity Codes** icon on the toolbar. In the Activity Codes window, verify the activity codes are correct. Any changes to the codes here will only apply to the current operator and do not affect the default codes. You can reset to the default codes by clicking on the blue arrow icon in the toolbar. Once you are satisfied, click on the **Save** icon and close the window.
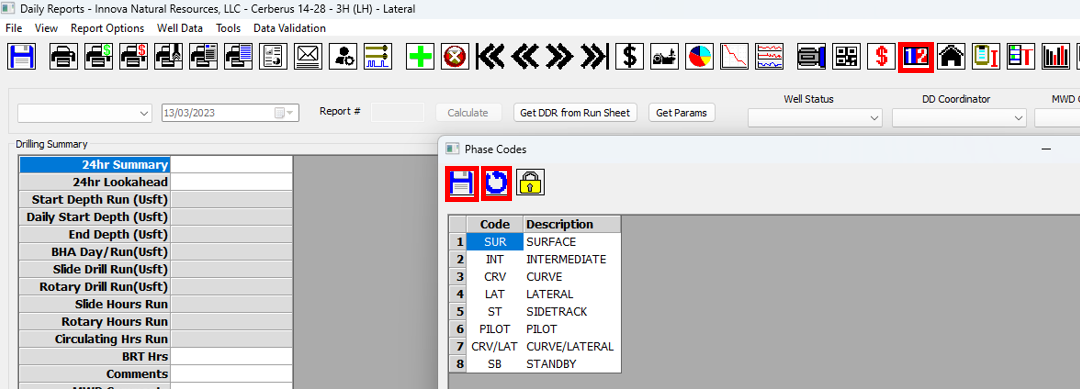
26\. Click on the **Phase Codes** icon on the toolbar. In the Phase Codes window, verify the phases codes are correct. Any changes to the codes here will only apply to the current operator and do not affect the default codes. You can reset to the default codes by clicking on the blue arrow icon in the toolbar. Once you are satisfied, click on the **Save** icon and close the window.
27\. Click on the **Cost Codes** icon on the toolbar. In the Cost Codes window, verify the cost codes are correct. Any changes to the codes here will only apply to the current well and do not affect the default codes. You can reset to the default codes by clicking on the blue arrow icon in the toolbar. Once you are satisfied, click on **Apply** and **Close.**
28\. In the Daily Reports window, set the **Well Status** as **Upcoming**. Select the **DD Coordinator** and the **MWD Coordinator** from the dropdown menus. If they are not available, go back to step 18 and update the Personnel Details. Click on the **Save** button and then close the window.
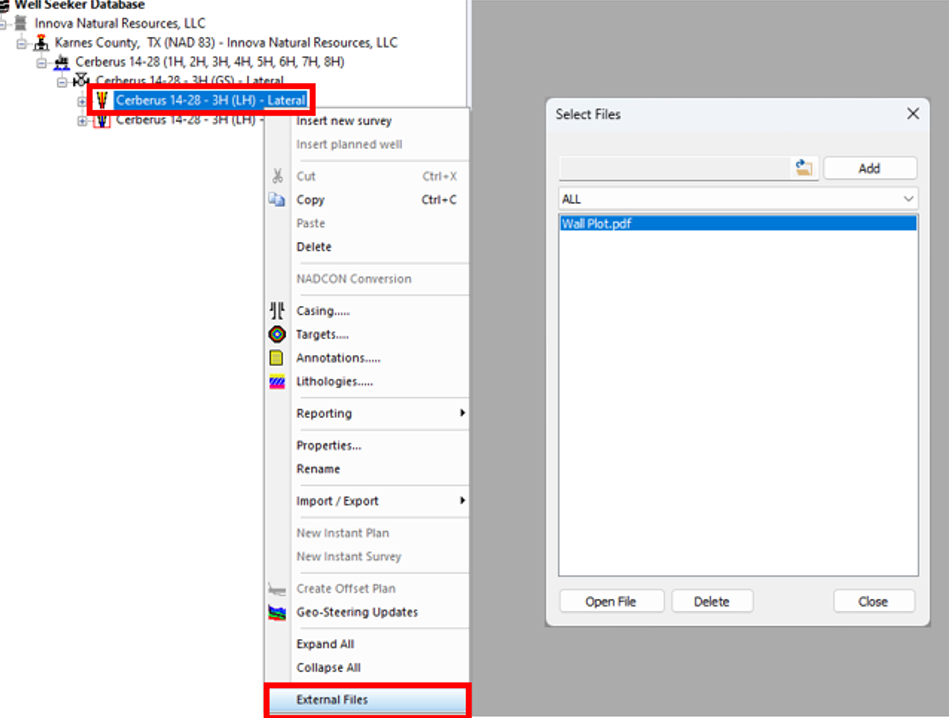
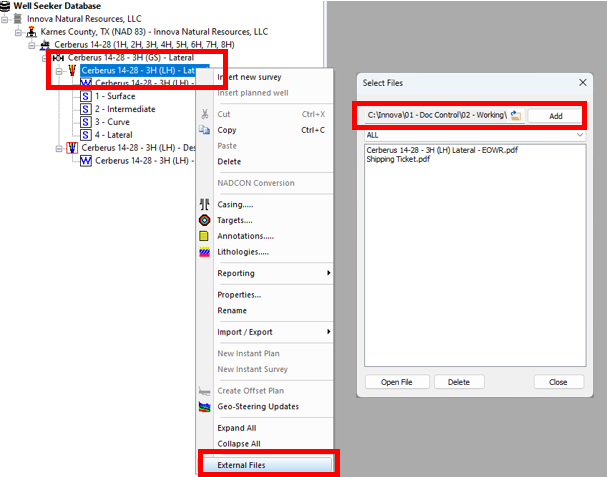
29\. Right click on the actual well and select **External Files**. Here you can add any file that you want the rig to have when they start the job. Click on the folder icon to select the desired file. You have the option to assign a category to the file if you wish using the drop down box. Click on the **Add** button to add the selected file to the well. Once you have added all of the desired files, click on the **Close** button.
## Rig Site – Pre-Job Steps
These steps detail how the rig crew can download the job data from the remote server, and get the software ready to record drilling activity.
1\. Open Well Seeker.
2\. If you use a single database to store all of your wells, select it by opening the **File** menu and click on **Select Database**. If not, create a new blank database by opening the **File** menu and click on **Create New Database**. After you have created your new database, you will need to select it using **Select Database.**
3\. You can confirm your currently selected database by checking the path displayed on the status bat at the bottom of your Well Seeker window.
4\. Use the Remote Data Fetch tool to pull down your job from the server database. Open the **Tools** menu and select **Remote Data Fetch.**
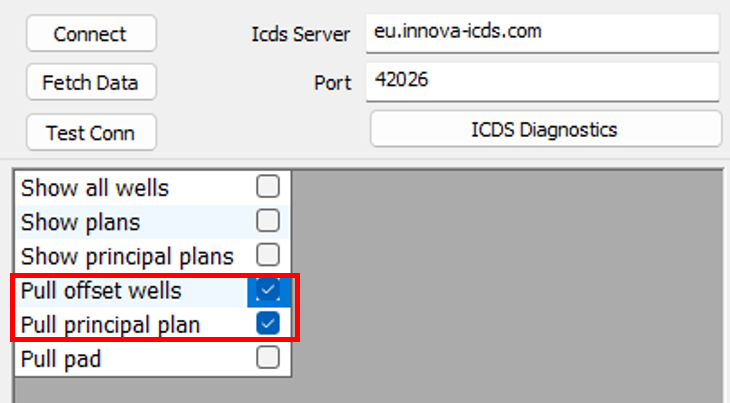
5\. In the Data Fetch window, enter the details for your company’s ICDS **IP Address** and **Port**. If you have a corporate license, these details may be automatically entered. If not, you will need to get them from your company administrator. After entering your details, click on the **Connect** button.
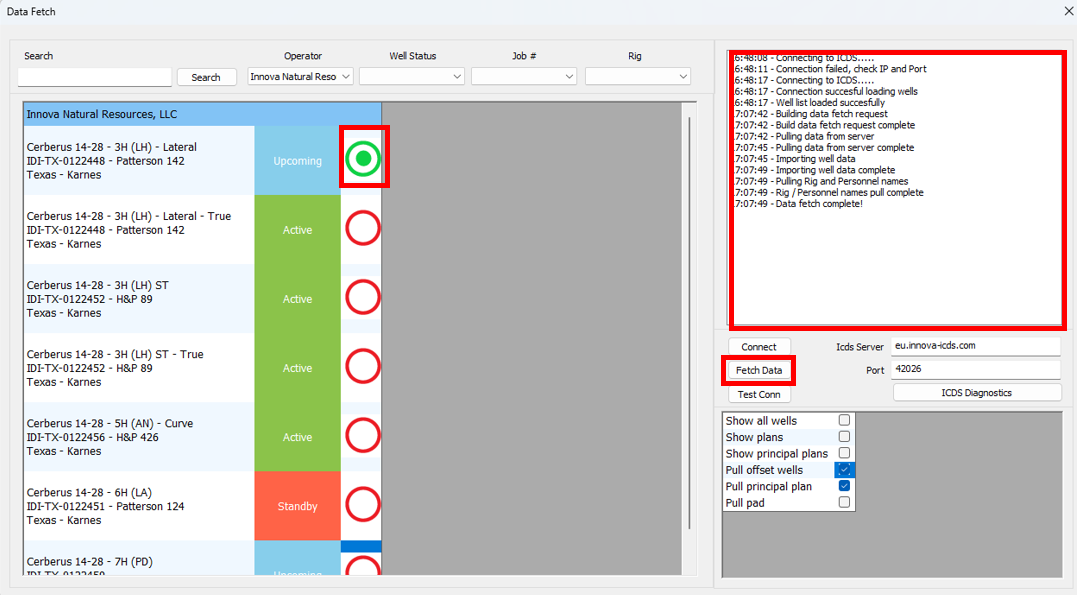
6\. Find your job in the list of wells on the server database. You can use the search box and the filter drop down boxes at the top of the window to narrow down the list.
7\. Make sure that **Pull Offset Wells** and **Pull Principal Plan** have been turned **ON** in the options section the bottom right corner of the window.
8\. Select the actual well for your job from the list by clicking on the circle, then click on the **Fetch Data** button. When the download is complete, the message box should display the message *Data Fetch Complete!* You can now close the window.
If you do not see any circles to select your well in the list, [**refer to this technical note**.](https://docs.innova-drilling.com/introduction/technical-notes/low-priority/remote-data-fetch-icons-missing)
9\. Right click on the actual well and select **External Files**. Here you can view any files that were attached to the job. You can also put any signed tickets here during the job.
10\. Right click on the well plan and select **Properties**. Check that all of the information is correct, and then click on **Close.**
11\. Double click on the well plan to open it. Check that the well plan matches what well planning sent in their report.
12\. The office will have made an actual well for you. Right click on the actual well and select **properties**. Check that all of the information is correct, and then click on **Close.**
13\. Right click on the actual well and select **Reporting >> Tool Inventory.**
14\. Fill in the inventory with your tools that you have on location. When you are finished, click on the **Save** button and then close the window.
15\. Right click on the actual well and select **Reporting >> Drill String Editor**.
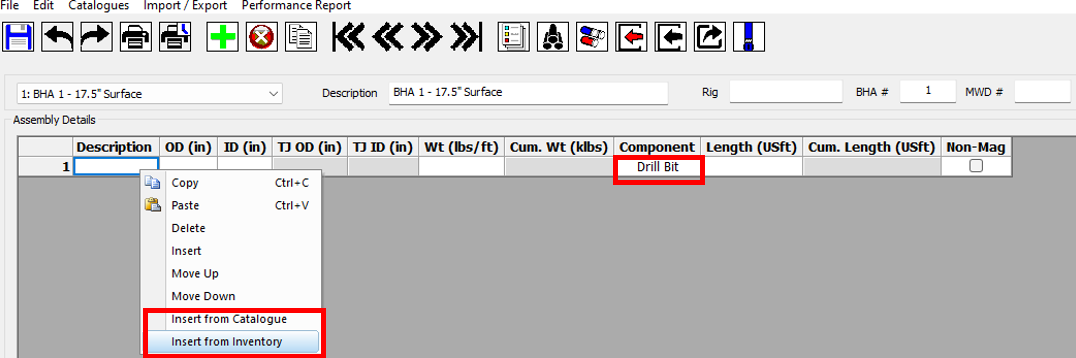
16\. You should find that the office personnel have already created the first BHA. Start filling in the components for the BHA, starting from the bit. For each component, start by selecting the component type from the **Component** column. Then right click on the row and select **Insert from Inventory**. This will allow you to pick one of the components that you recorded in the Tool Inventory. Alternatively, select **Insert from Catalogue.** This will allow you to insert components from a list of generic tools.
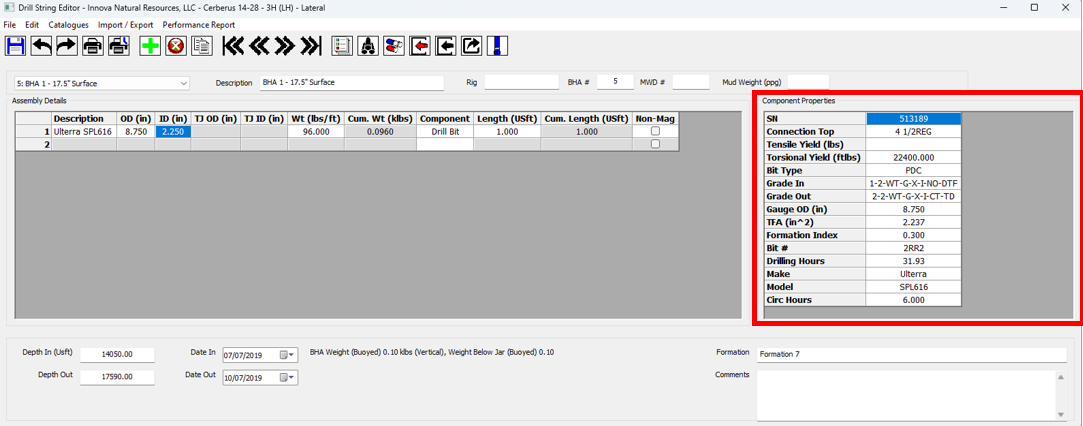
17\. After inserting a component, fill in its **Component Properties** on the right.
18\. Repeat the process for each component until the BHA is complete. You can also fill in the Rig, MWD #, Mud Weight and target Formation if you wish. Click on the **Save** icon and then close the window.
19\. Right click on the actual well and select **Reporting >> Daily Reporting**.
20\. Click on the **Add Daily Report** icon in the toolbar to create your first day.
21\. Click on the **Well Data & Personnel** icon in the toolbar.
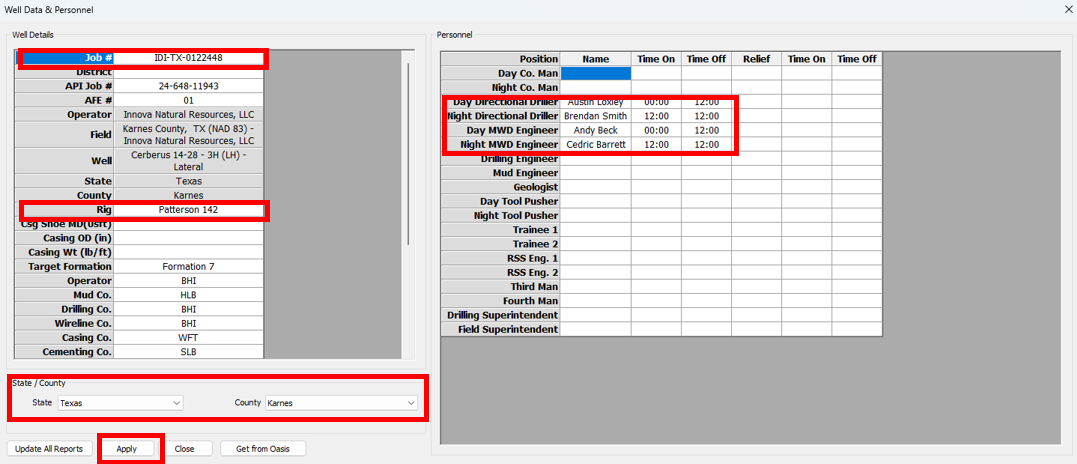
22\. Fill in the Well Data & Personnel with the information that you have, but make sure to fill in the **Job #, Rig, State, County** and the **Day/Night DDs and MWD Engineers.**
The Rig and Personnel fields should be selectable using drop down boxes. If not, go back to the Daily Reports window, open the **Report Options** menu and make sure that **Use dropdown list for personnel/rig** is toggled on.
After entering the information, click on **Apply**.
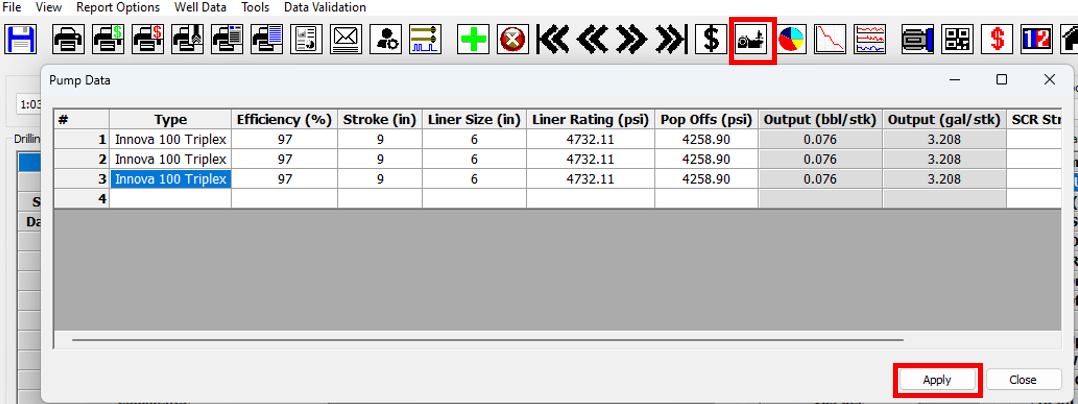
23\. If you wish to add pump information, you can add it by clicking on the **Pump Data** icon in the main toolbar. After entering the pump data, click on **Apply.**
24\. Click on the **Daily Costs** icon in the main toolbar. Enter the charges for the using the dropdown menu in the **Description** column. Enter the quantity and select an associated BHA, if applicable. After entering the charges, click on **Apply.**
25\. Open the **Reporting Options** and select **Set Default Activity Code / Description**. This option sets the activity and comment that will be used to fill in time gaps when the *Get DDR from Run Sheet* button is pressed. Usually this will be survey and connection time, so pick an activity that represents that.
If it is company policy to count survey and connection time as circulating time, choose an activity code starting with 5 such as **5A: Circulate**. If not, choose a different code such as **10D: Survey & Connection**. If in doubt, check with your coordinator.
26\. Set the Well Status to **Active**.
27\. You can now start recording your daily activities. Remember to save regularly by clicking on the **Save** icon in the main toolbar.
The Daily Reports window does not need to be closed in order for you to work in other parts of Well Seeker. It can be minimized or moved to another screen.
28\. All rigs should send data back to the server database. This can be done in the background using the Real Time Data Exchange. In the Daily Reports window, click on the **Real Time Data Exchange** icon in the main toolbar. If you are in the main Well Seeker interface, open the **Tools** menu and select **Real Time Data Exchange**.
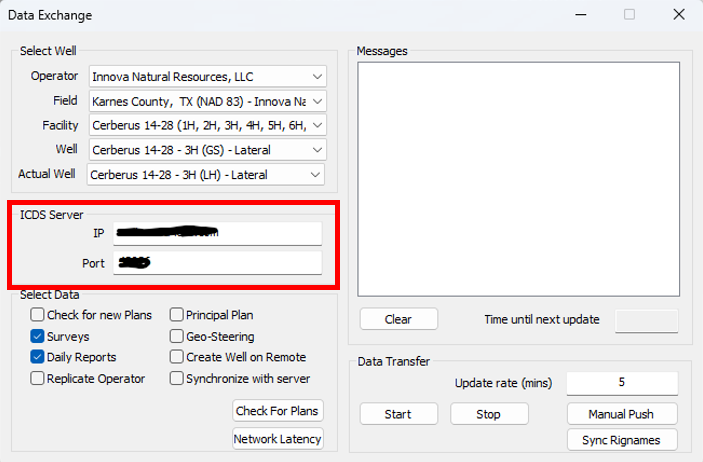
29\. In the Data Exchange dialog, use the dropdown boxes in the **Select Well** section to choose the current job.
30\. In the **ICDS Server** section enter the details for your company’s ICDS **IP** and **Port**. If you have a corporate license, these details may be automatically entered. If not, you will need to get them from your company administrator.
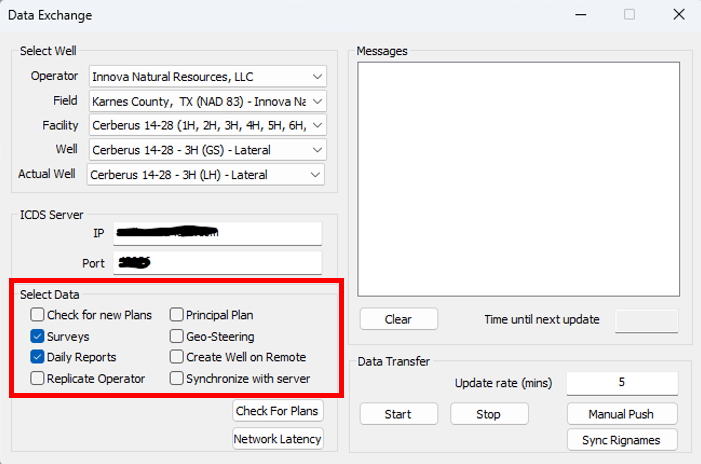
31\. In the **Select Data** section, select the data that you wish to push back to the server. At a minimum, select **Surveys** and **Daily Reports**. For other selections, discuss with your coordinator.
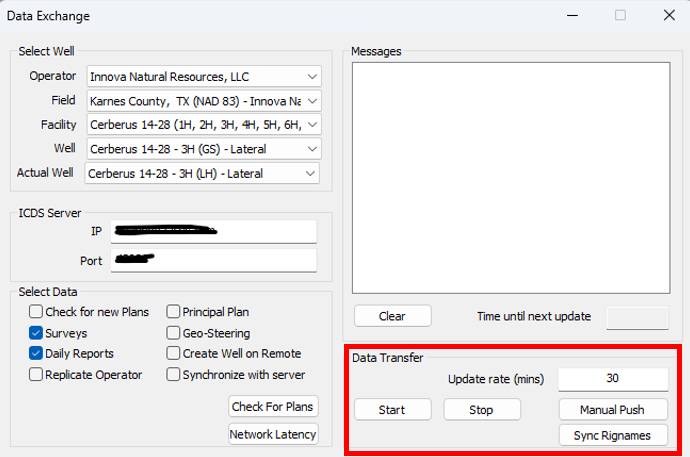
32\. In the **Data Transfer** section, set the **update rate**. This sets the time between pushes to the server. For this example, we will use 30 minutes. Click on the **Start** button to begin running the data exchange.
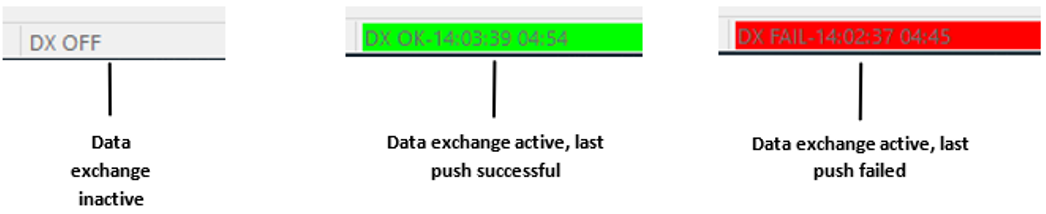
33\. You can now close the Data Exchange window. It will keep running in the background. You can view the status of the data exchange in the bottom right hand corner of the main Well Seeker window.
## Rig Site – WITS Setup
This section only applies if you are using a WITS feed from the rig to automatically fill in your slide sheet. If you are recording your slide sheet manually, you can skip to the next section.
1\. In the main Well Seeker interface, open the **Tools** menu and select **WITS mappings**. Coordinate with the rig to make sure that the RECORD\_ID and FIELD\_ID match with the incoming WITS data. When you have finished, click on **Apply**.
2\. The rest of the WITS options are found in the slide sheet. In the database tree, double click on the survey for the job to open it. Then right click on the survey in the database tree and select **Reporting >> Slide Sheet.**
3\. In the slide sheet window, click on the **Serial / TCP WITS Comms** icon in the toolbar to open the WITS Comms window. Choose your WITS settings depending on the method of input:
a. If you are using a serial cable, select your comm port in the **Serial WITS Settings** section.
b. If you are using an ethernet cable, select your input type, port and IP address in the **Ethernet WITS settings.**
4\. Click on **Start Reading**. You should see data coming through in the **WITS Data Stream** section.
5\. You should also send data back to the server. The **IP** and **Port** boxes on the right hand side of the window define which server you are uploading to, and are set by the IP and Port set in your Real Time Data Exchange window. Toggle on the **Send Data To Server** option. If the upload is successful, you will see the message *Update completed with no critical errors.*
6\. Minimize the WITS Comms window. Do not close it.
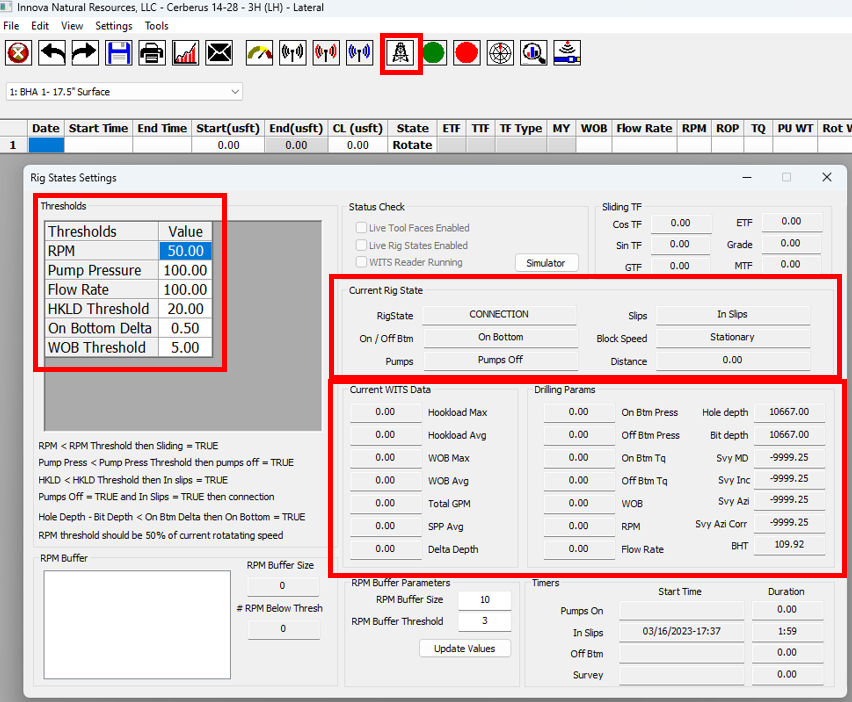
7\. Click on the **Rig States** icon in the Slide Sheet main toolbar. In the Rig States window, the incoming WITS values are displayed in the **Current WITS Data** section. Adjust the settings in the **Thresholds** section so that the WITS data is translated into the correct rig state in the **Current Rig State** section.
8\. Minimize the Rig States window. Do not close it.
9\. In the slide sheet window, make sure that the correct BHA is selected in the drop down box. Click on the green **Auto Populate Slide Sheet** icon in the toolbar. You will see the message *Live rig states running* appear and you will no longer be able to edit the slide sheet. Instead it will automatically populate using the incoming WITS data. To stop recording, click on the red **Stop Populating Slide Sheet** icon in the toolbar. Remember to **save** regularly using the save icon in the toolbar.
10\. Minimize the slide sheet, do not close it while recording WITS data. You will be able to work in the Daily Reports and main Well Seeker windows with the slide sheet minimized in the background.
## Rig Site – Drilling Operations
The steps below detail some of the tools available to the rig crew during drilling operations, as well as recommended procedures for filling in and performing quality control on your reporting data.
1\. Fill in your daily reporting activities until you are on bottom and drilling. From this point, begin recording your slide sheet and surveys. Drilling activities can be automatically transferred from the slide sheet to the daily report using the **Get DDR from Run Sheet** button, as detailed in **Step 9**, below.
2\. When viewing a survey sheet, the **Up/Down**, **Left/Right** and (Centre-to-Centre) **Dist** columns can be used to monitor how closely you are following the principal plan. If these columns are not available, they can be activated using the **Survey Column Show Hide** option in the **View** menu.
3\. If the wrong plan is set as the principal, it can be changed using the **Set as principal plan** option in the **Plan Properties** window.
4\. Plots can be viewed when a survey or plan is open. Click on any of the plot icons on the toolbar, or select them from the **Plots** menu.
5\. When viewing a plot, offset wells/plans can be toggled on or off by clicking on the **Toggle Offsets** icon on the toolbar. The selected offsets can be edited by clicking on the **Offset Selector** icon on the toolbar or in the **Tools** menu.
6\. Projections can be added to a survey using the **Multi-Project** and **Project Ahead** tools. Multi-project allows you to add multiple, simple projections, while Project Ahead utilises the same planning tools as the well plan. Both of these windows can be left open while working in other parts of the software. Access them using the icons in the toolbar or in **Tools >> Projection Tools**.
7\. The **Real Time Anti-Collision (RT AC)** dialog can be accessed when viewing a survey. Open it by clicking on the icon in the toolbar or by selecting **Tools >> Dashboards >> RT AC Warnings**. The RTAC will display the anti-collision results for all selected offsets, the principal plan and any lease lines/hard lines.
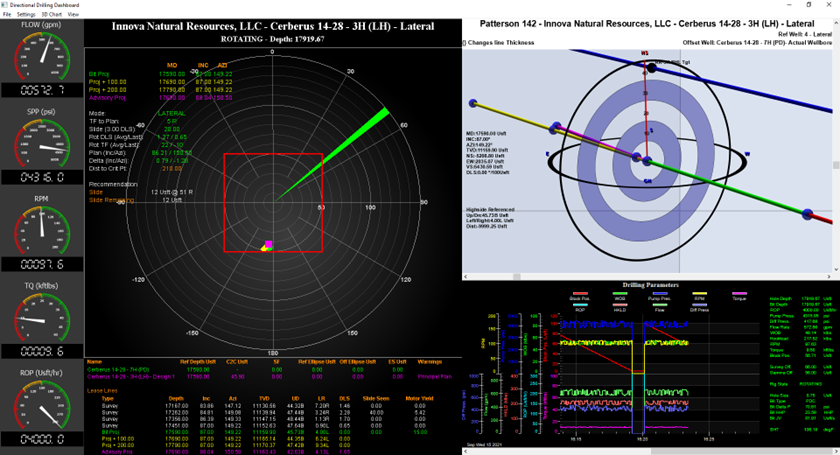
8\. The Directional Drilling (DD) Dashboard collects data from multiple sources within Well Seeker and displays them in one interface, allowing the Directional Driller or a RTOC to monitor drilling operations from a single screen. It is accessed via the Slide Sheet. In the Slide Sheet window, click on the **DD Dashboard** icon in the toolbar.
The DD Dashboard will then open. It can be left open while working in other parts of the software. Multiple DD dashboards can be opened at the same time, but this can be taxing on your computer’s CPU and memory.
The DD dashboard contains the following sections. For a detailed breakdown of these sections, refer to the [**Well Seeker Manual**](https://docs.innova-drilling.com/introduction/well-seeker-pro-1/13.0-reporting/13.11-directional-drilling-dashboard)**:**
* Real time gauges showing various drilling parameters. Requires WITS data from the rig.
* Toolface rose displaying details of the last slide.
* Real time anti-collision.
* Recent surveys with automatic bit projection.
* 3D plot showing principal plan and bit projection.
* Drilling parameters plot and current rig state. Requires WITS data from the rig.
9\. During drilling, click on the **Get DDR from Run Sheet** button in the Daily Reports window to automatically fill in your drilling activities using the data recorded in the Slide Sheet. Any gaps in drilling activity will be filled in with the default activity code that you set in the **Report Options** menu.
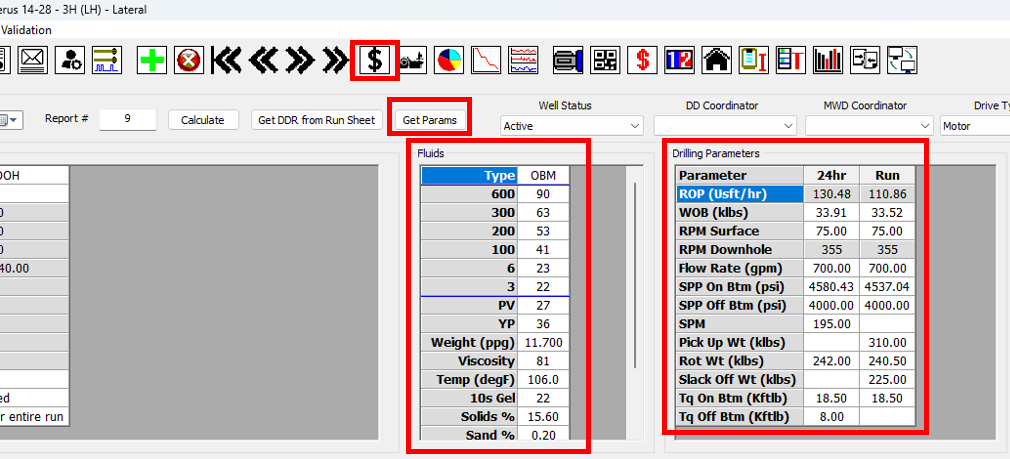
10\. Click on the **Get Params** button to automatically update your run and 24hr parameters using the data recorded in your slide sheet. Update mud properties and **Well Data & Personnel** with any changes. Remember to fill in the **Daily Costs** for each day.
11\. At the end of each day, it is recommended to QC your report. Open the **Data Validation** menu and select **Check activity against slide sheet**. If the drilling activities in your report do not match with the slide sheet, you will get an error message. You should also check the following:
a. The depth at the start of the day is correct.
b. All activity codes are correct.
c. If a BHA has been picked up or lay down, it has a **6O** or **6P** activity assigned. If no BHA is in the hole, the BHA field should be blank.
d. Every activity has a phase assigned to it.
12\. It is also recommended that you backup your database at least once a day. In the main Well Seeker interface, open the **File** menu and select **Backup Database**. This will let you save a backup copy of your database.
13\. Print your Daily Report by going to **File >> Print DDR** or **File >> Print PDF Reports >> Print DDR**. You can configure what is included in the DDR by opening the **Report Options** menu and using the **Daily Report** and **Additional Daily Report Options** submenus.
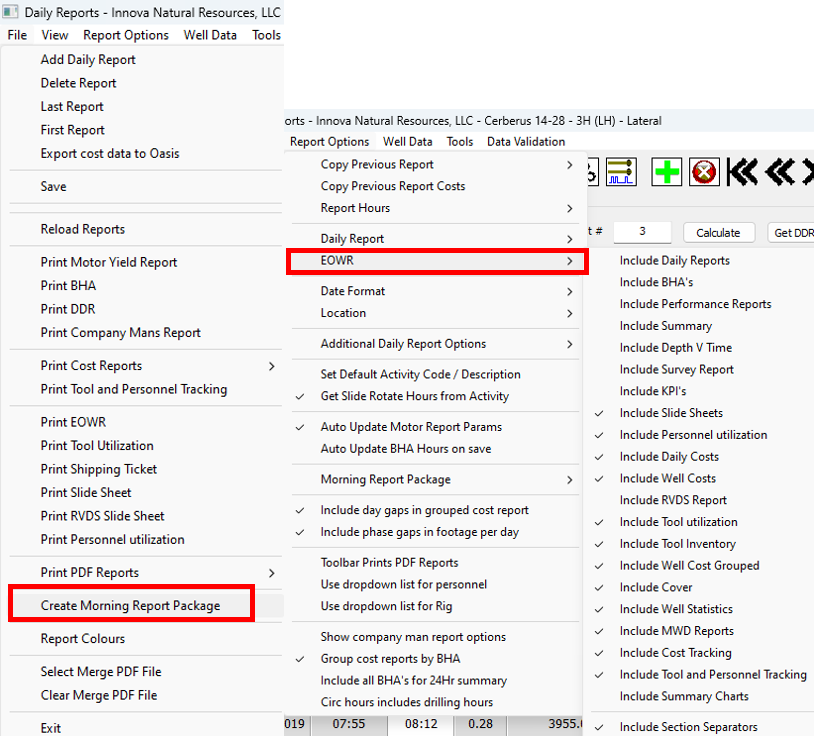
14\. You can create a morning report by going to **File >> Create Morning Report Package.** This morning report is treated like an End Of Well Report and is configured in the **EOWR** submenu in **Report Options.** The package contains the following:
a. A copy of the database.
b. An Excel format EOWR up to the current day.
c. An email template containing a summary of the current status of the well.
15\. At the end of a run you should fill out the performance report for the BHA. Open the Drill String Editor, select the current BHA and click on the **Performance Report** icon in the toolbar.
16\. In the Performance Report, click on the **Get Data From DDR**. This will automatically fill in the parameters section using data recorded in the Daily Reports.
17\. Click on **Get MWD Surface System**. This will pull all of the surface system serial numbers from the Tool Inventory, allowing you to select them using dropdown boxes in the MWD section.
18\. Make sure a **Reason for POOH** has been selected. Make any general comments on the run in the **Additional Comments** and **MWD Comments** section.
19\. If there was a tool failure, record it by clicking the **Motor Failed, MWD Failed** or **RSS Failed** check boxes. If a different tool caused the failure, just click the **Failed** checkbox in the top right. This will activate the Failure section allowing you to record details of the failure. Make sure to click the **Trip For Failure** or **LIH (Lost in Hole)** checkboxes if these apply.
20\. **Save** and then close the Performance Report.
21\. **Save** your BHA and then create the BHA for the next run by clicking on the **Add New BHA** icon. You can also click on **Copy BHA**, which will create a new BHA and copy over all of the components from the current BHA. Give the new BHA a name and BHA #. Once you have finished filling in the new BHA**,** you can **Save** and then close the Drill String Editor.
## Office – Monitoring Drilling Operations
The following steps introduce the tools that can be used to monitor the job from the office. These tools require the field engineers to be pushing data from the rig site using the Real Time Data Exchange. Some also require the WITS feed from the rig to be pushed to the server.
1\. Log into the remote server database.
2\. Open the **Tools** menu and select the **Dashboards** submenu. These dashboards can be used to provide information for multiple wells at the same time.
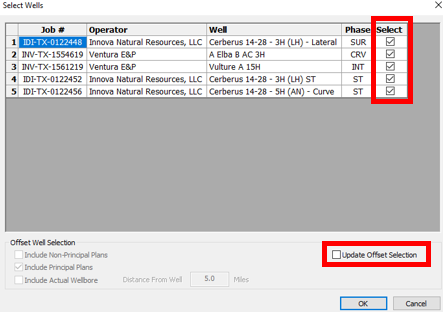
3\. The **Anti-Collision (AC) Dashboard** allows you to monitor the anti-collision status of multiple wells at the same time. Open the **File** menu and select **Open RT AC For Active Wells**. A window will appear displaying all wells that are currently set to active in the daily reports. Select the ones you want to monitor using the **Select** column. You can also change the offset settings of the wells by toggling **Update Offset Selection** on.
4\. Click on the **OK** button and Well Seeker will open the Real Time AC dialog for the selected wells. The AC Dashboard will also populate with two lines for each selected well. One will show the offset well with the lowest C2C distance to the selected well. The other will show the offset with the lowest SF to the select well. If any anti-collision limits are breached, the lines will be highlighted in red.
5\. The **Rigs Online Dashboard** displays all of the rigs that are currently pushing data to the server using the real time data exchange. The **Time Since Update** column displays the time in hours and minutes since the last update from the rig. Opening the **File** menu and selecting **Show WITS Connections** will cause the list to also display wells that are pushing WITS data to the server.
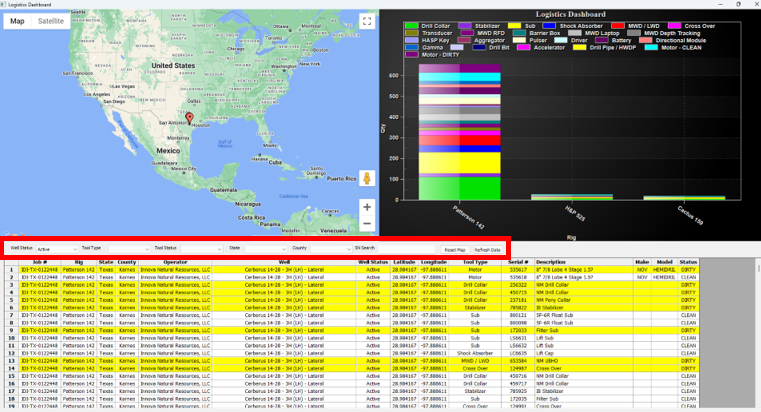
6\. The **Logistics Dashboard** searches all the well inventories in the database and displays all tools which are listed in these inventories. Note that if the *On Location* box is not checked, the tool will not show up in this dialog. The list van be filtered using the dropdown boxes and search bar.
7\. The **Activity Dashboard** displays an overview of all ongoing jobs in the server database – that is any job with the daily reporting status set as *Active, Standby, Upcoming* or *TD*. The list of wells at the bottom of the window can be filtered using the dropdown boxes. Selecting a well from the list will display information for that specific well.
8\. The **Incident Dashboard** displays all BHA failures that have occurred in the last 12 months. This is logged using the *Motor Failed, MWD Failed* or *RSS Failed* checkboxes in the performance report. Selecting a well from the list at the bottom will display the BHA assembly of the well.
9\. The **Directional Drilling** (**DD) Dashboard** collects data from multiple sources within Well Seeker and displays them in one interface, allowing the Directional Driller or a RTOC to monitor drilling operations from a single screen.
It is accessed via the Slide Sheet. Open one of the surveys for the well you wish to view. Then right click on the survey in the database tree and select **Reporting >> Slide Sheet.**
In the Slide Sheet window, click on the **DD Dashboard** icon in the toolbar.
The DD Dashboard will then open. It can be left open while working in other parts of the software. Multiple DD dashboards can be opened at the same time, but this can be taxing on your computer’s CPU and memory.
The DD dashboard contains the following sections. For a detailed breakdown of these sections, refer to the [**Well Seeker Manual**](https://docs.innova-drilling.com/introduction/well-seeker-pro-1/13.0-reporting/13.11-directional-drilling-dashboard):
* Real time gauges showing various drilling parameters. Requires WITS data from the rig.
* Toolface rose displaying details of the last slide.
* Real time anti-collision.
* Recent surveys with automatic bit projection.
* 3D plot showing principal plan and bit projection.
* Drilling parameters plot and current rig state. Requires WITS data from the rig.
## Rig Site – End Of Well Steps
Once drilling operations have finished, follow the below steps to QA & QC your reporting data and close out the well.
1\. Finish recording activities and parameters for the last day. Make sure that the last BHA has a *6P: Lay Down* *BHA* activity assigned. **Save** and then close the Daily Reports window.
2\. Save and close your slide sheet.
3\. Save your surveys. Open the Actual Well Properties and check that the survey program is updated down to TD.
4\. Once you have finished prepping your tools for backload, right click on the actual well and select **Reporting >> Tool Inventory.** In the Tool Inventory, mark tools that are ready for backload by clicking in the **Ready for Backload** column. When you are finished, click **Save** and close the window.
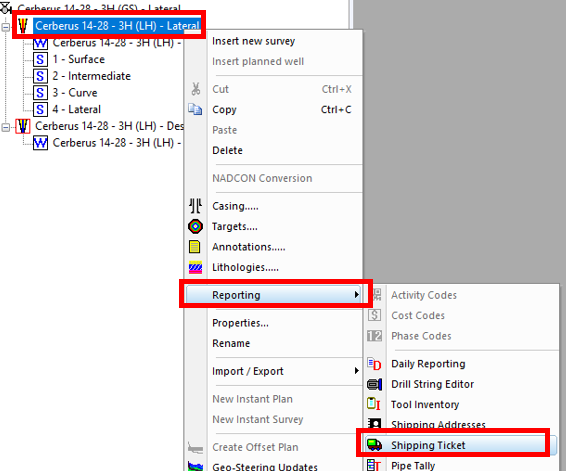
5\. Right click on the actual well and select **Reporting >> Shipping Ticket.**
6\. Create a new ticket by clicking on the **New** icon in the toolbar. In the **Shipping From** section, select the rig address from the dropdown box. In the **Shipping To** section, select the destination address. If these addresses are not available in the dropdown boxes, you can fill them in manually.
7\. Add a comment and then select the tools that you want added to the ticket by clicking in the **Select** column. If you marked tools as *Ready for Backload* in the Tool Inventory, you can quickly select them by clicking the **Mark Tools ready for Backload** button.
8\. **Save** your shipping ticket and then **Print** it. Once your tools have been shipped, you can click on the **Ship Tools** button to automatically mark your tools as off location in the Tool Inventory.
9\. Steps 10 - 18 detail how to perform a QA & QC check on the daily reporting in the well. Follow [**this link for an in depth video guide**](https://docs.innova-drilling.com/introduction/video-guides/how-to-videos/well-seeker-pro/daily-reporting/daily-reporting-qa-and-qc) on the below steps. Before starting, it is recommended to back up your database by opening the **File** menu and selecting **Backup Database**.
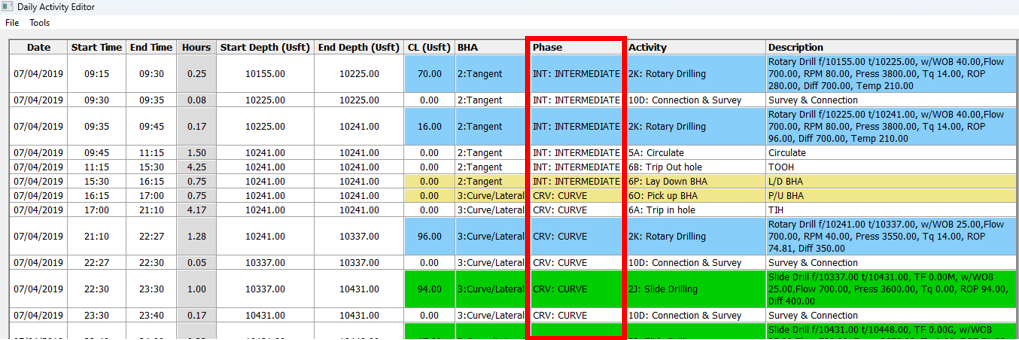
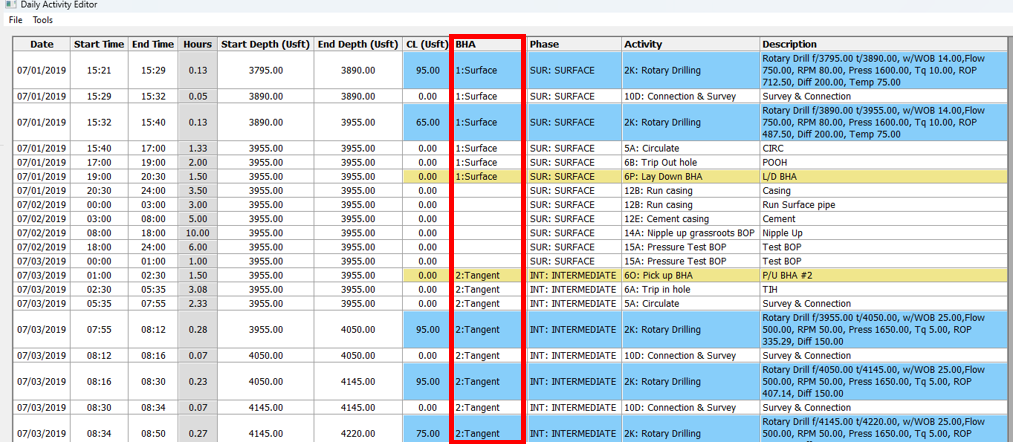
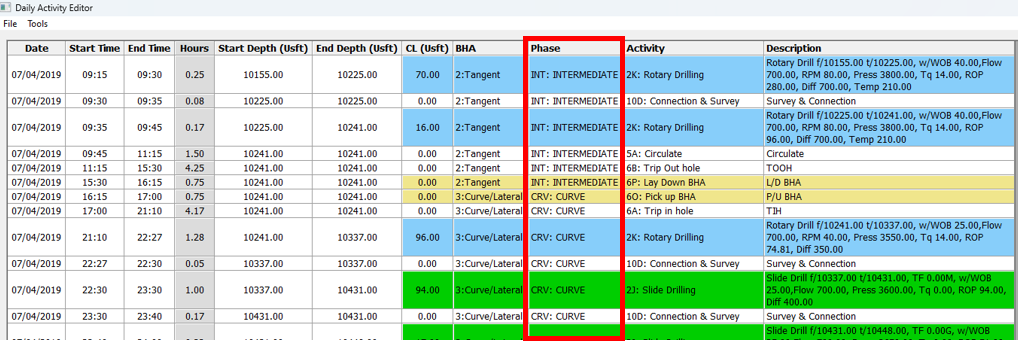
10\. Right click on the actual well and select **Reporting >> Daily Activity Editor.** Check for the following:
**a. Time Gaps** – The **start time** of every activity should match with the **end time** of the previous activity. The editor will highlight any gaps in red.
**b. Depth Gaps -** The **start depth** of every activity should match with the **end depth** of the previous activity. The editor will highlight any gaps in red.
**c. BHAs** – Every BHA should have exactly one **6O: Pick Up** and one **6P: Lay Down** activity. Every row should have the BHA selected while it is in the hole. When no BHA is in the hole, the BHA cell should be blank.
**d. Phases** – Every row should have a phase selected.
Once you have completed these checks, click on **Apply** and **Close**.
11\. Right click on the actual well and select **Reporting >> Daily Reporting.**
12\. In the Daily Reports window, open the **Data Validation** menu and select **Check activity against slide sheet all reports**. Well Seeker will generate and open a text file that details all of the places where the drilling activities in the slide sheet do not match up with the daily activities in the daily reports.
Use the text file as a guide, and alter either the daily reports or the slide sheet until all errors have been dealt with. When you are finished, click on the **Save** icon in the toolbar.
13\. Open the **Data Validation** menu again and select **Zero RPM for all slides on slide sheet**. This sets the RPM parameter on all slides in the slide sheet to 0, as this is supposed to represent surface RPM. Click on the **Save** icon in the toolbar again, and then minimize the Daily Reports window.
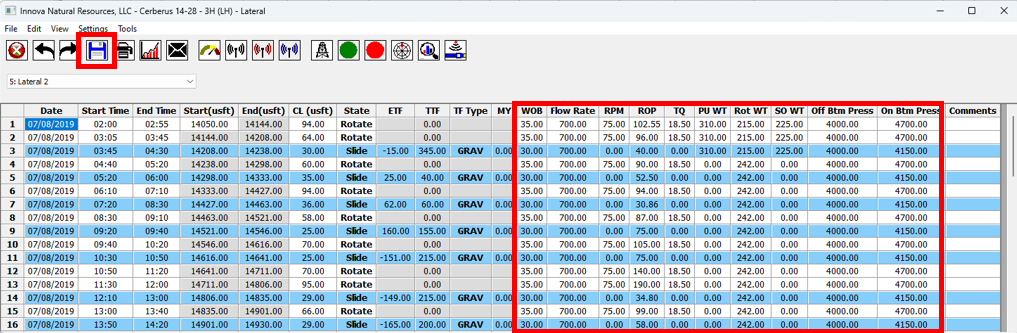
14\. In the database tree, double click on one of the surveys for the job to open it. Then right click on the survey in the database tree and select **Reporting >> Slide Sheet**. For each slide sheet in the well, check through your drilling parameters to make sure that there have been no typos or mistakes.
A common mistake is that the drilling parameters get entered with the wrong units. If you are not sure what units you are supposed to be using, open the Tools menu in the main interface and select Unit Sets. The units in this dialog are the units used in the slide sheet.
When you have finished with each slide sheet, save your changes by clicking on the **Save** icon in the toolbar. When you have finished with every slide sheet, close the slide sheet window.
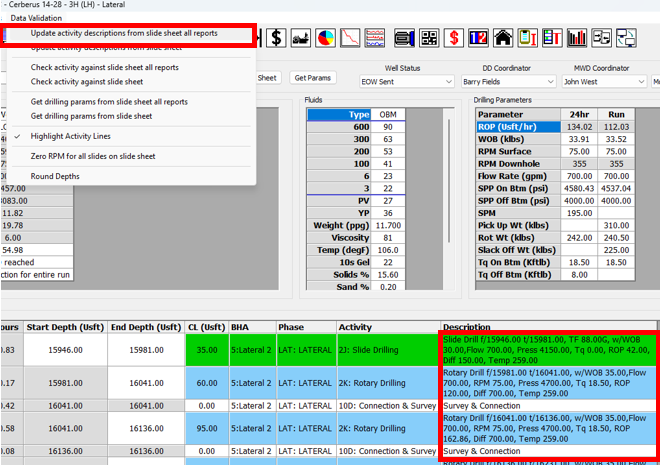
15\. Go back to the Daily Reports window, open the **Data Validation** menu and select **Update Activity Description from slide sheet all reports**. This will take the drilling parameters that you have just checked in your slide sheets, and use them to update the descriptions for your drilling and sliding activities in your Daily Report.
16\. Open the **Data Validation** menu and select **Get drilling params from slide sheet all reports**. This will take the drilling parameters that you have just checked in your slide sheets, and use them to update the 24hr and run parameters in in your Daily Report.
Click on **Save** in the toolbar and then minimize the Daily Reports window.
17\. Once you have finished QC’ing the Daily Report, you should make sure that all of your BHA performance reports are filled in. Right click on the actual well and select **Reporting >> Drill String Editor**, then open the **Performance Report** by clicking on the icon in the toolbar.
18\. For each performance report check that:
a. Parameters have been filled in. If not, you can click on the **Get Data from DDR** button in the toolbar. This will automatically update the drilling parameters in the performance report.
b. A reason for POOH has been selected.
c. If the BHA had a failure, make sure that this has been recorded.
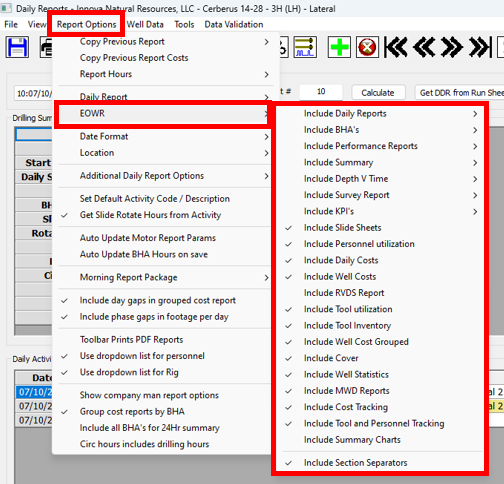
19\. You can now print your End of Well Report. In the Daily Reports window, open the **Report Options** menu and open the **EOWR** sub-menu. Toggle the options there on or off to set whether or not they are included in the EOWR.
20\. In the Daily Reports window, open the **File** menu and select **Print EOWR**. This will print your EOWR in Excel format. If you want to print in PDF format, select **File >> Print PDF Reports >> Print EOWR**.
21\. Set the well status to **EOW Ready** or **EOW Sent**. Click on **Save** and then close the Daily Reports window.
22\. Right click on the actual well in the database tree and select **External Files**. Add any relevant documents, such as the EOWR and the shipping ticket.
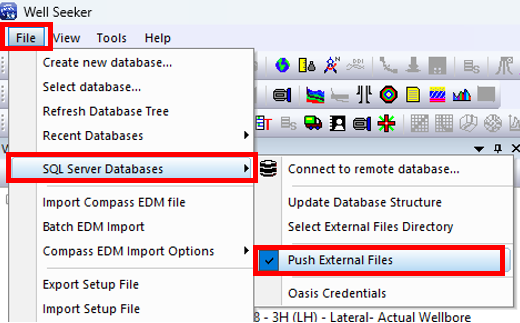
23\. Open the **File** menu and select **SQL Server Databases**. Make sure the **Push External Files** is toggled ON.
24\. Push the last update to the server. Open the **Tools** menu and select **Real Time Data Exchange**. Force a push by clicking on **Manual Push**. Wait for the message box to say *File Transmission Successful* and *External Files Transmission Complete*. You can then stop the data exchange by clicking on the **Stop** button and closing the window.
## Office – Post-Job Steps
After the rig has pushed their last update to the server, follow the below steps to QA & QC the data and verify that the well is finished. The rig may have already performed some of these steps during their End of Well procedure. Follow [**this link for an in depth video guide**](https://docs.innova-drilling.com/introduction/video-guides/how-to-videos/well-seeker-pro/daily-reporting/daily-reporting-qa-and-qc) on quality control for the reporting data.
1\. Verify that the bottom line of the actual wellbore and actual well properties match with the well planner’s details.
2\. Right click on the actual well and select **Reporting >> Daily Activity Editor.** Check for the following:
**a. Time Gaps** – The **start time** of every activity should match with the **end time** of the previous activity. The editor will highlight any gaps in red.
**b. Depth Gaps -** The **start depth** of every activity should match with the **end depth** of the previous activity. The editor will highlight any gaps in red.
**c. BHAs** – Every BHA should have exactly one **6O: Pick Up** and one **6P: Lay Down** activity. Every row should have the BHA selected while it is in the hole. When no BHA is in the hole, the BHA cell should be blank.
**d. Phases** – Every row should have a phase selected.
Once you have completed these checks, click on **Apply** and **Close**.
3\. Right click on the actual well and select **Reporting >> Daily Reporting.**
4\. In the Daily Reports window, open the **Data Validation** menu and select **Check activity against slide sheet all reports**. Well Seeker will generate and open a text file that details all of the places where the drilling activities in the slide sheet do not match up with the daily activities in the daily reports.
Use the text file as a guide, and alter either the daily reports or the slide sheet until all errors have been dealt with. When you are finished, click on the **Save** icon in the toolbar.
5\. Open the **Data Validation** menu again and select **Zero RPM for all slides on slide sheet**. This sets the RPM parameter on all slides in the slide sheet, as this is supposed to represent surface RPM. Click on the **Save** icon in the toolbar again, and then minimize the Daily Reports window.
6\. In the database tree, double click on one of the surveys for the job to open it. Then right click on the survey in the database tree and select **Reporting >> Slide Sheet**. For each slide sheet in the well, check through your drilling parameters to make sure that there have been no typos or mistakes.
A common mistake is that the drilling parameters get entered with the wrong units. If you are not sure what units you are supposed to be using, open the Tools menu in the main interface and select Unit Sets. The units in this dialog are the units used in the slide sheet.
When you have finished with each slide sheet, save your changes by clicking on the **Save** icon in the toolbar. When you have finished with every slide sheet, close the slide sheet window.
7\. Go back to the Daily Reports window, open the **Data Validation** menu and select **Update Activity Description from slide sheet all reports**. This will take the drilling parameters that you have just checked in your slide sheets, and use them to update the descriptions for your drilling and sliding activities in your Daily Report.
8\. Open the **Data Validation** menu and select **Get drilling params from slide sheet all reports**. This will take the drilling parameters that you have just checked in your slide sheets, and use them to update the 24hr and run parameters in in your Daily Report.
Click on **Save** in the toolbar and then minimize the Daily Reports window.
9\. Once you have finished QC’ing the Daily Report, you should make sure that all of your BHA performance reports are filled in. Right click on the actual well and select **Reporting >> Drill String Editor**, then open the **Performance Report** by clicking on the icon in the toolbar.
10\. For each performance report check that:
a. Parameters have been filled in. If not, you can click on the **Get Data from DDR** button in the toolbar. This will automatically update the drilling parameters in the performance report.
b. A reason for POOH has been selected.
c. If the BHA had a failure, make sure that this has been recorded.
11\. After all data QC has been completed, open the **Daily Reporting** for the well and changed the well status to **Verified**.
12\. If you have a clean master database, you can now transfer the well, using your company’s preferred method. After doing so, change the well status to **Transferred**.